Cut a Projection
General
- You can cut one or more adjacent projections at once.
- If you wish the cutting to follow changes made to the model, bind the cutting points to the points of the projection using constraints. If you move the cut projection, also the hidden lines have to be bound to geometry with constraints.
- Always click the cutting lines in pairs, the gap between the lines will be removed from the drawing. You can define the cutting line also outside the projection.
- If you want to change the cutting points of a projection, first remove the previous cut.
Cut projections of a model drawing
- Select Drawing | Tools |
 Projection >
  Cut View.
 - Select the projection or adjacent projections.
- Stop selecting projections.
- Press the middle mouse button or
- Press the V key or
- Select the context-sensitive function
 OK.
OK.
- Click the cutting points in the direction of the X axis in pairs.
- Click the cutting points in order from left to right or right to left.
- You can also click the first cutting point from outside the projection.
- You can also click the last cutting point from outside the projection.
- Finish or skip clicking the X-direction cutting points with the Confirm function.
- Press the middle mouse button or
- Press the V key or
- Select the context-sensitive function OK.
- Click the cutting points in the direction of the Y axis in pairs.
- Click the cutting points in order from bottom to top or from top to bottom.
- You can also click the first cutting point from outside the projection.
- You can also click the last cutting point from outside the projection.
- Finish or skip clicking the Y-direction cutting points with the Confirm function.
- Press the middle mouse button or
- Press the V key or
- Select the context-sensitive function OK.
- The program draws the projection as cut.
- If necessary, cancel cutting the projection with the function
 Undo or
- Press Ctrl+Z.
Cut the selected projections
- Select one or more projections to be cut.
- Projections must be adjacent projections, i.e. either side by side or on top of each other.
- Press the Ctrl key if you select more than one projection.
- Select an action Projection | Edit Cut View or
- Select the context-sensitive function Cut View.
- Select the context-sensitive function
- Continue as above, steps 4...8.
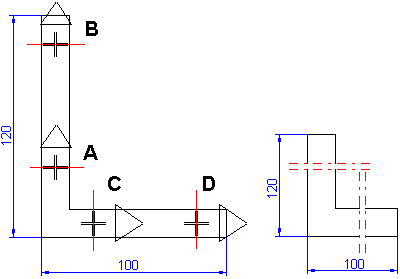
Example 1, cutting horizontally and vertically
You can define more than one cutting in the same projection by first defining one or more cutting points in the direction of the X axis and then in the direction of the Y axis.
- Cut a projection in two places: First, the horizontal cutting points A and B are clicked. After the Confirm function, the vertical cutting points C and D are clicked.
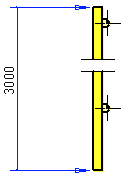
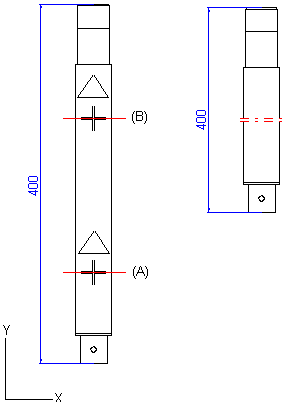
Example 2, vertical cutting
- Select two cutting points in the direction of the X axis: cutting point (A) and then cutting point (B).
- Vertical cuttings are ignored with the Confirm function.
Example: You can also cut an OpenGL-shaded or a visualized projection.