
Panel Drawings / Part Drawings Dialog Box
Framer
Check the status of the panel/part drawings, and create or open the drawings by using the dialog box functions, if necessary. The dialog box can be a floating window on the workspace, or you can fix it to the left edge of the workspace with the object tree and the project document browser: click the title of the dialog box and drag it over the object tree/document browser.
The status of a panel drawing may be one of the following:
- OK - Panel drawing exists and it is up to date.
- Out of date - Panel drawing exists, but the panel has changed and the drawing has not been updated after that.
- No drawing - Panel drawing does not exist.
The part drawing status of a panel may be one of the following:
- OK - Part drawings exist and they are up to date.
- Out of date - Part drawings exist, but the panel has changed and the drawings have not been updated after that.
- No drawing - Part drawings do not exist.
Organize the Contents
The panel label, the panel drawing status and the building floor in which the panel is located are displayed in the dialog box. You can organize the contents according to either the panel type or the status of panel/part drawings. At the bottom of the dialog box, select either of the following:
- By Type - Organize the contents according to the panel type.
- Beam - Beam panel drawings
- Truss - Truss drawings
- Wall - Wall panel drawings
- Floor or ceiling - Floor, ceiling or roof panel drawings
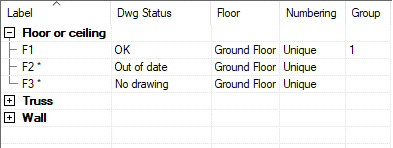
You can organize the panel/part drawings in the same branch according to the Label, Dwg Status, Floor, Numbering or Group by clicking the column titles.
- By Status - Organize the contents according to the status of panel/part drawings.
- Out of date - Panel drawing or part drawings exist, but the panel has changed and the drawings have not been updated after that.
- No drawing - Panel drawing or part drawings do not exist.
- OK - Panel drawing or part drawings exist and are up to date.
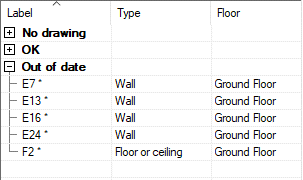
You can organize the panel/part drawings in the same branch according to the Label, Type or Floor by clicking the column titles.
Select Panels
Click the panels one by one while holding down the Ctrl key. You can also select a group of panels in the following way:
- Click the first panel.
- Press the Shift key, and click the last panel of the group.
Create the Panel Drawings of the Selected Panels
Create the panel drawings of the panels with the status No drawing. Drawings will not be opened in the workspace.
- Right-click to open the context-sensitive menu.
- Select Generate.
- Select a template drawing in the dialog box. The suitable template drawings are highlighted in blue in the dialog box. One of the suitable template drawings is selected by default.
- Confirm by clicking OK.
- Click Exit to close the dialog box.

Update the Panel Drawings of the Selected Panels
- Right-click to open the context-sensitive menu.
- Select Refresh.
- Click Exit to close the dialog box.
Open the Panel Drawings of the Selected Panels
Open the panel drawing of a panel with the status OK.
- Right-click to open the context-sensitive menu.
- Select Open.
- Click Exit to close the dialog box.
You can also open other panel drawings:
- If the status of the panel drawing is Out of date, the program updates and opens the drawing.
- If the status of the panel drawing is No drawing, select a template drawing in the dialog box.
Change the Numbering System of Selected Panels
- Select the panels.
- Right-click to open the context-sensitive menu.
- Select Panel Numbering, and one of the following:
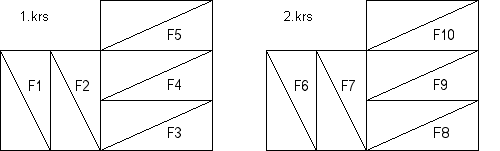
- Change to Unique Numbering - Each panel gets a label of its own.
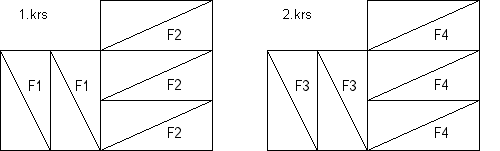
- Change to Floor Based Numbering - All identical panels in the same floor get the same label.
- Change to Project Based Numbering - All identical panels get the same label regardless of the floor.

- Change to Unique Numbering - Each panel gets a label of its own.
- Click Exit to close the dialog box.
Set Panels to a Group of Their Own
You can protect the numbers of the selected panels by creating a group of them. The numbers that the panels have in the group are not available outside the group. If there are panels outside the group that have the same number as panels in the group, they will be renumbered. Changes in the numbering of panels outside the group will not affect the numbering of panels in the group.
- Select the panels.
- Right-click to open the context-sensitive menu.
- Select Panel Numbering > Set to Own Group.
- Select the panels.
- Right-click to open the context-sensitive menu.
- Select Panel Numbering > Set to Default Group.
Change the Prefix of Selected Panels
- Select the panels.
- Right-click to open the context-sensitive menu.
- Select Panel Numbering > Change Panel Number Prefix.
The Panel Label Update dialog box opens. The dialog box list contains prefixes of the selected panels, sorted by panel type. Current prefixes are listed in the Old Value column.
- Enter the new prefixes in the New Value column.
The new prefix must be unambiguous. The program marks ambiguous prefixes in the dialog box.
- Confirm by clicking OK. The prefixes are updated in the Panel Drawings dialog box. The prefixes are updated in the project when you close the Panel Drawings dialog box.
Create the Part Drawings of the Selected Panels
Create the part drawings of the panels with the status No drawing. Drawings will not be opened in the workspace. A panel drawing must be created of a panel before a part drawing can be created.
- Right-click to open the context-sensitive menu.
- Select Generate.
- Select the parts of which you want to create drawings in the dialog box.
- Confirm by clicking OK.
- Click Exit to close the dialog box.
Open the Part Drawings of the Selected Panels
Open the part drawings with the status OK.
- Right-click to open the context-sensitive menu.
- Select Open.
- Select the part drawings from the list based on the panel label and part number.
- Click Exit to close the dialog box.
Delete the Part Drawings of the Selected Panels
- Right-click to open the context-sensitive menu.
- Select Delete.
- Select the part drawings from the list based on the panel label and part number.
- Click Exit to close the dialog box.