
Parameters of the Supporting Structure
Select the parameters of the supporting structure in the dialog box. You can open the dialog box in the following ways:
- When you are adding the supporting structure, select
 Parameters.
 - When you want to edit the parameters of an existing structure, double-click it in the model or in the log wall elevation.
Define the Height of the Columns
You can define the height of the columns by specifying it in the model or by typing its value. If you have opened the parameters for editing in the log wall elevation, you can specify the height also in the elevation drawing.
Specify the height in the model
Activate the model window before opening the parameters for editing. Do either of the following:
- Define same height for both columns as follows:
- Click the Digitize bottom and top -button.
- Click the bottom and top edge locations in the model.
- Define different heights for columns as follows:
- Click the Column in button.
- Click the bottom and top edge locations of the inside column in the model.
- Click the Column out button.
- Click the bottom and top edge locations of the outside column in the model.
Type the height value
- Type the height value the Top field.
- Type the height position of the column's bottom end in relation to the macro's origin in the Bottom field.
 By default, the macro's origin is at
the bottom edge of the log wall. You can change the location of the origin by specifying the
bottom end of the column in the model, or by moving the macro in the model.
By default, the macro's origin is at
the bottom edge of the log wall. You can change the location of the origin by specifying the
bottom end of the column in the model, or by moving the macro in the model.
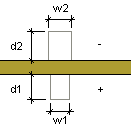
Define the Cross Section of the Columns
Type the dimensions of the inside and outside columns in the Width and Depth fields.
- Column in Width (w1)
- Column in Depth (d1)
- Column out Width (w2)
- Column out Depth (d2)
Define the Bolt Parameters
Type the number of bolts in the Bolts field.
The Bolt length is the sum of the wall thickness and the Depth dimensions of the columns. If necessary, you can lengthen the bolt by typing a desired value in the empty text field.
You can define the bolt location in the following ways:
- Select the bolt locations in the model or in the log wall elevation by clicking the Digitize bolt locations button. Click the locations of the bolts one by one, and select the Confirm function. The heights are refreshed in the text field of the dialog box.
- Type the height of each bolt in relation to the bottom edge of the log wall in the text field. Separate the bolt heights from each other with the vertical bar character (|).