
Setting a Roof on Top of Log Walls: A Non-Parametric Building Model
Add an eaves line with the Modeling | Floor, Roof |  Roof
Roof ![]()
 Eave Line function and a
roof with the Modeling | Floor, Roof | Roof
Eave Line function and a
roof with the Modeling | Floor, Roof | Roof ![]()
 Gable function, for
example.
Gable function, for
example.
When you select the roof parameters, proceed as follows:
- Select the parameters:
- Select Roof material, Fascia height, Rafter size and Eaves type as you usually would when adding a roof.
- You can define the pitch in two different ways: by entering a value for the Roof pitch parameter or by selecting the walls on top of which the eaves and ridge of the roof are positioned. If you want to select the walls that determine the pitch, the value of the Roof pitch parameter is not taken into consideration. Select the walls later.
- The values of the Plate height and Eaves height do not matter during this stage.
- Make sure that the value of the Overhang parameter is correct.
- Make sure that the value of the Seat cut parameter is 0. If the parameter has a different value, the shape of the cross section of the log is not taken into consideration when determining the locating height of the roof.
- The Log wall clipping offset from roof parameter determines how
the logs of a log gable wall are cut by the roof.
 If no value has been selected
for the parameter, or its value is 0, the program will use the value of the
roof_clip_offset keyword in the LOGHOUSE setup file.
If no value has been selected
for the parameter, or its value is 0, the program will use the value of the
roof_clip_offset keyword in the LOGHOUSE setup file.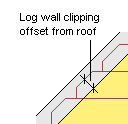
The clipping offset defined by the keyword is displayed in the log work drawing. In the model, the logs are clipped by the bottom surface of the roof regardless of the keyword value.
The parameter wedge_height is also connected with the roof clipping, see Loghouse File.
- Click the Set roof on walls button.
- Choose from which work window you select the wall.
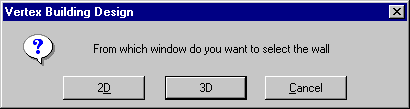
In the drawing window, you can only select the walls that were added to the active drawing-model pair. If, for example, the active drawing-model pair is Roof, with walls displayed in the drawing window as reference drawings, you cannot select the walls in the drawing window. You must then choose the selecting the walls in the 3D model function.
- Select the wall on top of which the eaves will be positioned.
- Do either of the following:
- Select the wall on top of which the ridge of the roof will be positioned.
Select a wall or a log beam on top of which the ridge of the roof is positioned to have the program calculate the roof pitch based on the height difference between the selected walls, and then use this pitch to calculate the eaves height.
- Select Confirm.
The program will calculate the eaves height using the value in the Pitch field as the roof pitch.
The dialog box opens again and the Plate height and Eaves height parameters are automatically updated. If you selected two walls to determine the pitch, the Pitch parameter will also be updated.
- Select the wall on top of which the ridge of the roof will be positioned.
- Confirm the parameters by clicking OK. The parameters are applied to the roof and the geometries of the floor plan and the model are updated.
 Note
Note
- Working with the model is faster, when you select the wall height so that there are not more than 2 extra logs above the roof.
Example