
Add an Eave Line
You can use this function to add an eave line in the 2D drawing of a building. After adding the eave line, you can add a roof by clicking the points of the eave line.
 Do not use eave lines when adding a
roof to a parametric building model.
Do not use eave lines when adding a
roof to a parametric building model.
Add an eave line by clicking the lines of the wall according to which the eave line runs. The eave line is a line chain that can be managed with the line functions.
The eave line is normally added without selecting the roof parameters, in which case the parameters are selected later when the roof is being added. In special cases, parameters can be selected already when adding an eave line by selecting trusses or rafters as the roof structure. The roof overhang has a default value, which has been defined with the project parameter ROOF_OVERHANG.
- Do either of the following:
- Select Modeling | Floor, Roof |
 Roof
Roof 
 Eave Line.
 - Right-click to open the context-sensitive menu, and select
 Eave Line.
- Select Modeling | Floor, Roof |
- Select undefined eave structure (default), roof trusses, roof rafters or attic from the auxiliary menu.
- Select the roof overhang from the quick selections, or use the function
 Roof overhang.
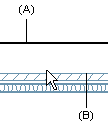
 - Click the first line of the wall. When you add the eave line (A) in a drawing-model pair
where the walls are displayed as a reference drawing, click the wall line (B) from the side
on which the roof overhang is to be added.
- If necessary, select a new roof overhang.
- Click the other lines/walls such that the eave line forms a continuous line chain.
- After clicking the lines of all walls, select the Confirm function.


 Note
Note
- The object type of the eave line is Lines.
- The floor base height, default eave height and default overhang are defined in the project parameters.
- If you are using the Vertex BD Architectural or Pro product, you can add the eave line to the floor plan drawing according to an existing roof by using the function Generate an Eave Line to the Floor Plan.