
Add a Locating Plate/Head Binder for a Classic Wall Panel
Framer
You can add locating plates and/or head binders for the wall panels you selected. They are added to the model and floor plan drawing but are not displayed in the wall panel drawing.
- Select Classic Wall Framing | Wall Panelizing |
 Edit Panel
 Add Locating Plate/Head
Binder.
Add Locating Plate/Head
Binder. - Select the wall panels.
- Select Confirm.
- Select the properties of the locating plates/head binders from the dialog box:
- Head binder, Locating plate 1-3. Select the dialog box of the part you want to add. Head binders 1, 2 and 3 refer to head binders to be positioned on top of each other. The cross section of the part is displayed in the text field. You can change the cross section by clicking the Sel button.
- Select side. Select how the locating plate/head binder will be
positioned in relation to the lower/upper edge of the wall or wall panel.
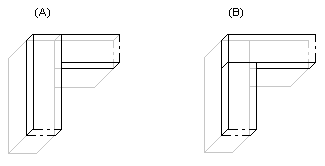
Head binder - Select either of the following:
- Top (A)
- Bottom (B)

Locating plate - Select either of the following:
- Top (A)
- Bottom (B)

- Locating plate total thickness. The field shows the total thickness of the cross sections you have selected.
- Wall width. The field shows the width of the cross sections you have selected.
- Head binder corners and Locating plate
corners. Select either of the following:
- By walls - Corner overhang as for the wall panels.
- Reverse corner - Corner overhang opposite to that of the wall panels.

 Note
Note
- You can use this function to add locating plates/head binders to classic wall panels. If you are panelizing walls using the method based on the model, add locating panels/head binders with the Add Locating Plate/Head Binder function.