Revolve
Revolve the sketch around the rotation axis. Draw the axis to the sketch, or point the axis from the sketch later. Revolving adds material (Boss) to or cut out material (Cutout) in the volume. You can select the revolve feature after accepting the sketch. Define the revolve properties in the dialog box, so that the feature is modeled.
New revolve feature
- Add a New Sketch.
- Sketch the shape to be revolved.Note:
- The revolve will be available when the lines on the sketch form a closed line chain.
- You can sketch a rotation axis to the sketch or select it afterwards from it.
- If you sketch the rotation axis, select Rot.Axis as its line type.
Note:- You can dimension the diameter of a part which is rotationally symmetric.
- The dimension will change between distance and diameter when you move the cursor over the rotation axis before positioning the dimension.
- The type of one of the lines must be Rot.Axis.
- This works for both the Distance and the Dimension constraints.
- After positioning the dimension you can drag the it elsewhere and it will remain a diameter dimension.
- Select
 OK.
OK. - Select either
 Boss or
  Cutout according to whether you want add or remove material.
 - Select
 Revolve.
 - Enter the revolve properties and select .
- If you did not draw the rotation axis to the sketch, add it by selecting a line or two points.Note:
- You can select an edge or coordinate axis from the sketch as the rotation axis, for example.
- You can use a cutout feature to divide a part by selecting

 Make New Part.
 - Draw the rotation axis to the sketch as a two-point line, and select rotation axis as the line type.
- Edit the data of a feature by first selecting the face formed by the feature, then selecting the context-sensitive function Edit Operation.
- You can also edit the feature sketch by selecting the sketch in the feature tree, then selecting the context-sensitive function Edit Sketch.
 Revolve Feature Data Sketch Line Properties
 Add a New Planar SketchDraw a Model SketchEdit a Sketch
Revolving a Cross Section
You can also create a revolve based on a cross section.
- Select the face of the cross section.
- Select one of the following:
 Revolve> Boss.
- Revolve> Cutout.
- Define the revolve feature properties in the dialog box.
- Select OK.
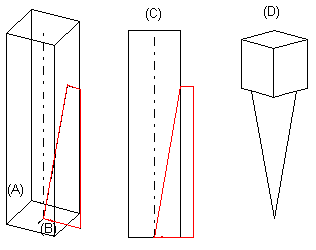
Example: Revolve
Add a new sketch to the face of a prismatic part (A) using the Advanced function, and enter coordinates as the origin offset to move the origin to the center of the bottom face. After this, draw the sketch and rotation axis in a perpendicular view (C). Rotate the sketch 360 degrees, cutting out material (D).
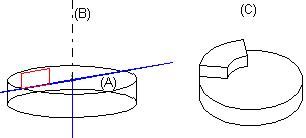
Example: Revolve
Add a new sketch to the face of a part (A) at an angle (90 degrees). Draw the sketch, click two points of the rotation axis on the vertical axis of the coordinate system (B), and rotate 75 degrees, adding material (C).