
Butt Weld 3D
You can add a butt weld between two parts. A butt weld has a top surface and a bottom surface.
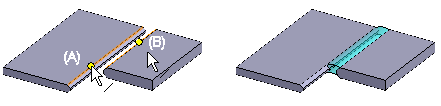
The weld can have different shapes on the top and bottom surfaces. You can attach two parts together with a weld by first selecting the edge line (A) of the top surface from a part and then selecting a sweep line (B) from the second part.
Select the lines so that the cursor snaps to the line from the side of the top surface. The length of the weld is determined by the length of the sweep line.
You can adjust the weld length by defining a start point and end point for the weld from the sweep line.
- Select the context-sensitive function
 Add> Weldments.
 The dialog box is open when you are defining weld data and clicking weld elements from the model.
 - Define the butt weld data in the dialog box as follows:
- Select Butt Weld as the weld type.
- Fill in a description of the weld in the Description field.
- You can choose different weld shapes for the top and bottom surfaces. Define the top surface weld in the Shape 1 field and the bottom surface weld in the Shape 2 field. Select the weld profile: Convex, Concave, or Flat.
- You can add an offset to the weld ends if you select the Click start/end checkbox. Fill in the offset values in fields Offset 1 and Offset 2.
- If the sweep line is a straight line, one cross section (1) is enough. If on the sweep plane is an arc or the spline, add the number of the cross sections.
- When you have defined the weld data, continue by selecting an edge line from the part, on the side of the top surface (A). Move the cursor near the line so that the cursor snaps to the line from the side of the top surface.
- Select a sweep line from the second part from the side of the top surface (B).
- Do one of the following:
- Continue adding the same kind of weld by clicking the weld elements from the parts.
- If necessary, edit weld data before clicking the elements for the next weld. Select the weld from the list, edit the data and click Apply.
- When all the weld is added, select OK.
- You can model a weld feature in the assembly. A weld feature is an assembly feature.
 Weld Feature