
Add a SmartSnap Roof Ladder
In the macro component browser, you can select a roof ladder component that is a so called SmartSnap component. Positioned SmartSnap components include external references to the surrounding model geometry. If you edit the model geometry, the SmartSnap component will adapt accordingly.
When adding a SmartSnap component to a model, also select matching objects for the component constraints. For a roof ladder, the length and pitch is determined by selecting the eave and the ridge of the roof. Next, you can select the longitudinal position of the ladder on the roof.
- Activate the model window.
- Do either of the following:
- Select Modeling | Accessory Component | Component gallery

 Component.
 - Right-click to open the context-sensitive menu, and select
 Add Furniture, Symbol, Building Group....
- Select Modeling | Accessory Component | Component gallery
- Select the Roof Accessories/Ladders folder.
- Double-click the 0152 Roof ladder thumbnail.
- Place the ladder in approximately its correct position. The exact position can be defined later.
The roof ladder is opened in a separate model window for viewing. You can rotate the component, change the projection, or zoom the component in and out.
- Follow the prompts when positioning the SmartSnap component in the model.
- The prompts (A) appear right below the model window.
- Simultaneously, the SmartSnap object (B) for which you are prompted to select a matching object in the model is highlighted.
- The illustrative image created for the SmartSnap component will be displayed below the model and the prompt.
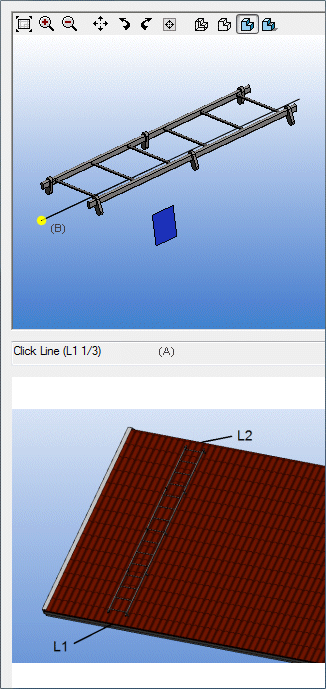
- Select the eave line on the roof (L1).
- Select the ridge line on the roof (L2).
- Click the Close button in the window to close the browser.
- Select the ladder in the model.
- Click the square grip point. You can move the ladder on a plane parallel to the roof slope.
- Click a position.
Note: You can also position the ladder by adding a distance constraint between the gable eave and the ladder.