You can select the properties of a terrain being added or edited in the dialog box.
- Add
- Click Add, when you want to add terrain points. When you click the points in a drawing, enter the height of the point in meters in the Base z-height [m] field.
- In the drawing, you can define the height according to either absolute or relative height system. In the absolute system, the height is measured in relation to the sea level. This requires that the building’s height data - site height, site height from model origin and building height from model origin - have been set, see Building Coordinates and Heights. The building height calculated according to the given height data is displayed in the Base z-height [m] field. If the height data has not been set, the systems do not differ from each other.
- Select one of the following:
-
- Digitized - Click the points in the model.
- Absolute - Enter the height of the terrain point in relation to the sea level, and click a point in the drawing.
- Relative - Enter the height of the terrain point in relation to the model's origin, and click a point in the drawing.
 Example: Heights of Terrain Points
- Enter the height in meters in the Active z-height [m] field, when you click the points in the floor plan drawing.
- Click the points or lines, which will obtain the given height. You can cancel the last added point by pressing Ctrl+Z.

- Select Confirm. Click again Add, enter the height (when Absolute or Relative height system is in use), click the points, and select the Confirm function.
- After the Confirm function, you can continue adding, moving or deleting points.
- Move
- Click Move, when you want to move terrain points. Select a point to be moved, and select its location.
-
- In the drawing: Select a single point by pressing the X key, when the cursor is over the point. If necessary, edit the value in the Active z-height [m] field. Select a new location for the point.
- In the model: Select a single point. Click a new location for the point, in which case you will also define the height of the point.
- You can select several points by limiting a rectangular area or a polygon.
-
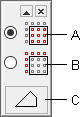
- A - Select the points inside the limited area.
- B - Select the points outside the limited area.
- C - The default shape is a rectangular. Click the button, when you want to click a polygon shaped area.
- You can move all the selected points to the same height or in such a way that their relations to each other are maintained.

-
- D - Move to the same height
- E - Move in the same proportion
- You can cancel the last moved point by pressing Ctrl+Z.
- Select the Confirm function, and continue adding, moving or deleting points.
- Delete
- Click Delete, when you want to delete terrain points. Click the points to be deleted. You can select several terrain points by drawing an area with the cursor.
-
- In the drawing: Select a single point by pressing the X key, when the cursor is over the point.
- In the model: Select a single point.
- You can select several points by limiting a rectangular area or a polygon.
-
- A - Select the points inside the limited area.
- B - Select the points outside the limited area.
- C - The default shape is a rectangular. Click the button, when you want to click a polygon shaped area.
- You can cancel the last deleted point by pressing Ctrl+Z.
- Select the Confirm function, and continue adding, moving or deleting points.
- Active z-height [m]
- Enter the height of a terrain point in meters in the Active z-height [m] field, when you click the points in the floor plan drawing. First, select either of the following as the height system:
- Absolute - Enter the height of the point in relation to the sea level, and click a point in the drawing.
- Relative - Enter the height of the point in relation to the model's origin, and click a point in the drawing.
- In the absolute system, the height is measured in relation to the sea level. This requires that the building’s height data - site height, site height from model origin and building height from model origin - have been set, see Building Coordinates and Heights. The building height calculated according to the given height data is displayed in the Base z-height [m] field. If the height data has not been set, the systems do not differ from each other.
- Example: Heights of Terrain Points
- Base z-height [m]
- The building height calculated according to the building height data is displayed in the Base z-height [m] field. If height data has not been set, the base z-height is 0.
- Building Height Data
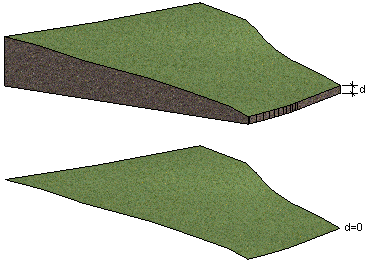
- Thickness of ground [m]
- The thickness of the modeled ground layer (d) at the lowest terrain point. If the value is 0, the terrain consists of just the surface in the model.
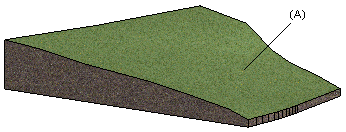
- Material to ground
- Select the material (A) of the ground surface, used in shading and in a rendered model, from the list. The list contains a number of pre-selected LightWorks materials. You can select any LightWorks material by selecting the final option on the list, More. Select the material from the browser.
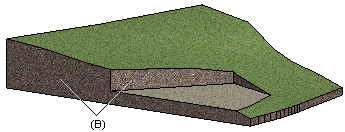
- Material to section
- Select the material for the ground section (B), used in shading and in a rendered model, from the list. The list contains a number of pre-selected LightWorks materials. You can select any LightWorks material by selecting the final option on the list, More. Select the material from the browser.
- Select 2D line properties
- The default drawing properties of terrain lines in a drawing are defined in the system settings with the line name TERRAIN.LINE2D. You can edit the properties by clicking Select 2D line properties. Select a predefined property set from the list, or select the Line font, Layer, Pen and Scale properties individually.
- Select 3D line properties
- The default drawing properties of terrain lines in a model are defined in the system settings with the line name TERRAIN.LINE3D. You can edit the properties by clicking Select 3D line properties. Select a predefined property set from the list, or select the Line font, Layer, Pen and Scale properties individually.
- The 3D line properties of the terrain affect the presentation of the terrain in the elevation views. If you do not want the terrain to be visible in the elevation views, hide the terrain before updating the views.
