
Material Relocation Dialog Box
Use the functions in the dialog box to define the location and size of the material texture.
- You can select the starting point of the hatch on the face by clicking the Position button.
- You can select the direction of the hatch on the face by clicking the Direction button.
- You can move the hatch on the face by clicking the Point button.
- You can define the size of the hatch on the face by clicking the Click button.
Dialog Box Options
- Location
- You can use this button to select the starting point of the texture on a face. The program will add coordinate axes to the selected point after you have selected the texture direction by clicking the Direction button. The colors represent the X axis (red), the Y axis (green), and the Z axis (blue).
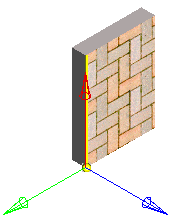
- Direction
- You can use this button to define the direction of the texture on the face in relation to the selected starting point. Define the direction by selecting a point, line or face. The red X coordinate axis is positioned in the direction you specified (see top figure). The yellow face edge line illustrates the line you selected as the direction.
- Offsets: Point
- The easiest method of moving the texture on a face is to define an offset by clicking.
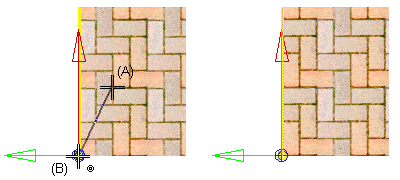
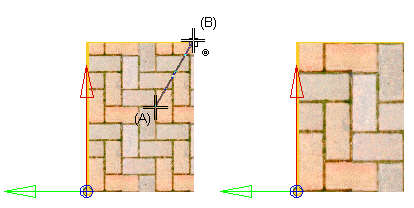
- Size: Point
- The texture size is defined as a factor in the direction of the axes. The default value is 1. With factor values less than 1, the texture is made smaller. With factor values greater than 1, the texture is made larger. Fill in new values in the fields and click Preview to see the effect in the model.
- Preview
- You can click this button to see what effect the values you have entered in the fields have on the model texture.
- Delete
- You can click this button to delete all changes you have made to the texture. The texture is reset on the face.
- Relocation with points, Main surface of volume
- These features are not used in the Vertex BD application.