
Adding Additional Profiles
Framer
You can add a profile added to the floor plan drawing using the profile functions - a beam, for example - at the right height and in the right location in the panel drawing. A panel drawing of the wall needs to exist before you can select the wall. The wall and the profile need to be selected on the floor plan drawing, so before selecting the function, you need to close and save the open panel drawing, and select the building's 2D drawing as the active window.

- Select Classic Wall Framing | Panel |
 Edit Profile
 Add Additional
Profiles.
Add Additional
Profiles. - Select the wall (A). A panel drawing of the wall needs to exist before you can select the wall.
- Select the profile (B).
- Select one of the following:
- Copy only geometry to panel drawing - The part is displayed as line geometry in the panel drawing. The part has no label, and it will not be added to the part list.
- Copy piece to the panel as a part - The part is labeled, and it will be added to the part list of the panel drawing.
- Move piece to the panel as a part - The part is labeled, and it
will be added to the part list of the panel drawing.
 Pleas note, that the part will be
entirely removed from the building model, and the function cannot be cancelled.
Pleas note, that the part will be
entirely removed from the building model, and the function cannot be cancelled.
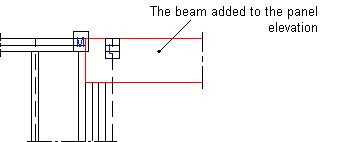
- Open the panel drawing.
The added profile is shown in the panel drawing.

 Note
Note
- Beams that are perpendicular to the wall can also be added to the panel drawing.