
Extra Backers
Framer
An extra stud can be used as a backer on an intersecting wall, for example. Add the backer macro as follows:
- Select Modeling | Panel |
 Wall >
  Wall Panel Layout Accessories.
 - Select Extra backers to floorplan from the browser. The Extra Backer Properties dialog box opens.
- Select the backer properties:
- Number of studs - Select from the list.
- Section - Cross section dimensions of the extra stud. Select the cross section from the profile library by clicking the Sel button.
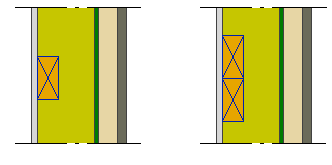
- Side - Select either of the following as the location of the extra stud:
- Int - The extra stud is positioned on the inner surface (A) of the frame.
- Ext - The extra stud is positioned on the outer surface (B) of the frame.

- Number of studs - Select from the list.
- Confirm by clicking OK.
- Select a wall.
- If necessary, change the locating point of the macro, or select another auxiliary function. By default, the locating point is the center point of the stud or stud group.
- Select a location for the macro.
- Quit by pressing the Esc key.

Note:
- You can relocate the panel macro by dragging the grip point before generating the panel breaks.
- Once you have generated the wall panels and added parts to them, you can add a backer, stud, or blocking to the panel by using the function Studs.