
Stair Generator
When adding a stair, select the stair type and parameters and the parameters of steps, strings and railings from the Stair Tool dialog box. When adding a railing, you can select only the railing parameters from the dialog box. The parameter values are marked with the following colors in the dialog box:
 - White. You can change the parameter value.
 - Orange. The parameter most frequently changed.
 - Grey. You cannot change the parameter value.
 - Red. The values selected for other parameters cause an
invalid value for this parameter. Change the values of the other parameters.
- Red. The values selected for other parameters cause an
invalid value for this parameter. Change the values of the other parameters.
- Parameters
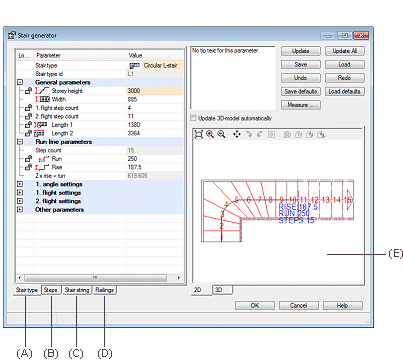
- Select the stair type from the Stair type tab (A) of the dialog box. Select the type from the list.
 Stair Type Parameters
-
Step Parameters
-
String Parameters
-
Railing Parameters
- Locking a parameter
- Depending on the stair type, you can lock some of the stair parameters so that a locked parameter will not change when you change the other parameters. You can lock a parameter by clicking the symbol in front of it. If the symbol is not shown, the parameter can not be locked. Do either of the following:
- Preview
- You can view the 2D drawing of the stair in the preview window (E). The 2D drawing is updated automatically each time you change the parameter values.
- Saving
- To save the designed stair, click the Save button. Select the save folder and the file name in the Save As dialog box. The file is saved in XML format. Later, you can select the saved stair by clicking the Load button.
- Measure
- You can measure the parameter value in the floor plan drawing or in the model.
 Note
Note
- The line properties of a stair's and railing's 2D geometry can be defined in the system settings, see Stair and Railing Line Properties in a 2D Drawing.
- You can show or hide all parameters at the same time as follows: Click the right mouse button in the list. Select Expand all or Collapse all from the menu.
- If you are using turned balusters or short baluster spacing, updating the model may be slow. You can deactivate the handrail and/or balusters on the Railings tab of the dialog box. Select None as the value for the parameters Handrails and/or Balusters.