
Flange Feature Data
Sheet-Metal Design
Dialog Box Options
- Radius R, Angle A, Length L
- Define the values of the inner radius R, bend angle A and length L.
- Formula
- Defines the dimension’s variable.
- Point
- Click the button and select, for example, a length from the sheet-metal part.
-
- You can set the length to a surface or point. You can enter the offset value to a field
 at the same time.
 - A positive offset value is outwards of the surface and a negative value is inwards to the surface when pointing a surface.
- A positive value continues the bending feature past the point and a negative value leaves the bending feature shorter when pointing a point.
- You can set the length to a surface or point. You can enter the offset value to a field
- Alternatively, you can click a point outside of the model (B) by selecting the context-sensitive function
 OK or by pressing the middle mouse button to have the length of the sheet be determined by the line drawn by the cursor.
- If the check box is selected, the chosen element is saved in the feature.
- Select
- Click the button to start the definition of a user-defined bend radius. The button is active only when a user-specific fitting has been defined.
- Feature Type
- Defines the bend to be added as follows: red color indicates the sheet metal part before the bend. Select either

 Add whole bend,
  Inside dimension or
  Outside dimension.
 - Cut type
- If you select Inside dimension or Outside dimension and add the flange feature between existing flange features, you can select the cut type from a list. Select either Only edge, Edge + corner or Whole end. If you select Edge + corner, the program will cut the edge and also the corners of the flanges next to it.
- Additional Dimensions
- In addition to the main dimensions you can also enter more specific additional dimensions for the flange. Most additional dimensions have two sides, 1 and 2. The sides are displayed in the model. You can also select additional dimensions from the model.
-
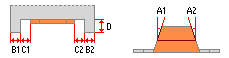
Figure 1: Definitions of the additional dimensions. - Side Angle
- Define the values of the side angles into the Side angle A1 and Side angle A2 fields.
-

Figure 2: Example: A1 is 60 degrees and A2 is 10 degrees. - Take in
- Define the values of the take ins into the Take in B1 and Take in B2 fields.
-

Figure 3: Example: B1 is 30 mm and B2 is 10 mm. - Gap
- Define the values of the gaps into the Gap C1 and Gap C2 fields.
-
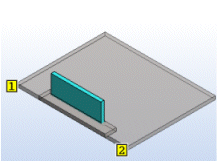
Figure 4: Example: B1 and B2 are 20 mm, C2 is 10 mm and D is 10 mm. - Depth
- Define the depth into the Depth D field.
- Flip Direction
- Change the bending direction by selecting
 button.
 - Edge trim
- Trim edges automatically while you create a flange feature by selecting
 Edge trim. Automatic trimming uses the symmetric trim as a default. The software creates two features in the feature tree. Flange and Edge trim. You can edit both features individually.
 - You can add selection Edge trim to an existing flange feature, if that specific flange feature is the last phase in the history. If there are other features added in the history already, you can add trimming as it's own work phase.
- Elements
- A list containing the selected edge lines. You can select different flange parameters for each edge line. From the list, select the edge line whose parameters you wish to change and enter the values into the fields. You can add, change or delete selected elements on the list.