Move a Part Number Cluster
General
- A part number cluster moves in following ways:
- With the Drag and Drop method, when you drag a part number with a reference line from one place to another.
- With the context-sensitive function Move text of the part number grip point.
- By moving the element (line) to which the starting point of the reference line of the part number is assigned.
- You can prevent the part number cluster from moving along with the reference line part number if you press the Alt key while clicking a new location for the part number.
Move by using the Drag and Drop method
- It is assumed that the starting point of the part number's reference line is bound to an element. The other part numbers are bound to the previous part numbers.

- Move the cursor over a part number with a reference line.
- Press the mouse selection button down.
- Drag the part number to the desired location.
- Release the mouse selection button.
- Other part numbers follow the part number with reference line.
Use the Context-sensitive Move Text Function of the Grip Point
- It is assumed that the starting point of the part number's reference line is bound to an element. The other part numbers are bound to the previous part numbers.

- Click the part number with the reference line.
- A blue grip point appears in the center of the part number.
- Move the cursor over the grip point and its color will change to green.
- Select the context-sensitive function Move Text.
- Click a new location for the part number.
- Other part numbers follow the part number with reference line.
Note: If the first part number of the cluster is placed in such a way that the starting point of its reference line is under the part number ball, i.e. the part number does not have a visible reference line, only the part number you selected will be moved.

Move the Element to Which the Reference Line is Assigned
- If the starting point of a part number (reference line) is clicked on a line, then the part number or the part number cluster follows the line when it is moved.
- This functionality does not require a part number to be bound to the geometry of the line in the dialog box Part number.
- If the part number is bound to the geometry of the hatch (section pattern), the part number does not move when the hatch moves.
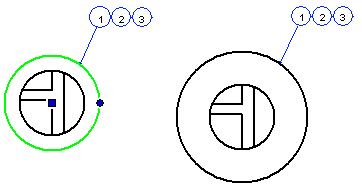
Example:

- The reference line for part number 1 is clicked on a circle line.
- Part numbers 2 and 3 are clicked inside the previous part number ball.
- The circle line is selected and its grip point appears (figure on the left).
- The circumference of the circle has been dragged by the grip point to a larger diameter (figure on the right).
Move a Part Number to Another Cluster
- A part number cluster cannot be moved directly to be part of another cluster.
- An individual part number can be moved next to another part number or to a part number cluster.
- If you want to move a part number cluster to another cluster, you have to do it one part number at a time.
If you want to move a part number with a reference line next to another part number or to a part number cluster, then
- First remove the reference line from it using the part number grip point's context-sensitive function Delete Reference Line. For more information, see the instructions Add or Delete a Branch or a Meander Branch to a Part Number
- Select a part number without a reference line.
- A blue grip point appears in the center of the part number.
- Move the cursor over the grip point and its color will change to green.
- Select the context-sensitive function Move Text.
- Click a new location for the part number inside the existing part number ball.
- If necessary, repeat steps 1..3 until all part numbers of the cluster have been moved to the new cluster.
