
Add a Part Number Next to the Other
General
- You may want to connect part numbers if the corresponding parts are connected together. For example, in a screw connection, the part numbers of the screw, nut and washers are side by side on one reference line.
- A new part number can be added to the left, right, above or below the part number.
- This insertion method is related to the function Add Part Numbers and is only available for independent drawings made by drawing.
- If you add several part numbers in this way, a part number cluster is formed, the part numbers of which are linked to each other.
- If a part number with a reference line is moved, the other part numbers attached to it will be moved with it.
- A part number which does not appear to have a reference line has one, but it is not visible. If necessary, you can add the reference line with the context-sensitive function. See Add a Reference Line to a Part Number Where it Does not Exist.
Starting point
- A part number or part numbers have already been added to the drawing, next to which you want to add a part number.
- Part numbering is in progress with the function Drawing | Mechanical |
 Parts List >
  Part Number.
 - The program asks you to click the start point (of the reference line).
Position a Part Number Next to Another Part Number
- Click the part number next to which you want to add the new part number.
- Click the location inside the part number ball.
- Click the location closest to the fourth of the ball where you want the new part number to be added.
- The program adds the part number without a reference line.
- Continue to add the next part number.
- Click the start point (of the reference line) either inside the part number ball or
- Click the start point (of the reference line) somewhere else, and click the position of the part number.
- Stop adding part numbers.
- Select another function or
- select the context-sensitive function
 OK or
OK or - press the Esc key.
Example
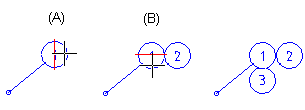
- The reference line for part number 2 is clicked inside of the part number ball 1, on its right edge.
- The reference line for part number 3 is clicked inside the part number ball 1, at its bottom.