
Adding Sheets and Battens to the Metal Roof Layout
Architectural, Framer
After you have added the necessary eave macros and roof siding origins to the layout of a metal roof, add the metal sheets and battens to the layout.
- Select the roof slopes in the roof layout. Click the slopes one by one with the Ctrl key pressed down, or click one slope and then select all slopes by pressing Ctrl+A.
- Right-click to open the context-sensitive menu.
- Select
 Generate Roof
Siding and Blocking.
Generate Roof
Siding and Blocking.
The program highlights the first roof slope in color.
- The roofing properties of the slope are opened in the Roof Cover Parameters dialog box. Check the roofing properties, such as the material code, name and color. If necessary, edit the width or eave overhang of the sheet.
- Define the start point of the batten spacing on the eave. The definition method depends on
the customer fitting. The start point can be defined with the following distances, for example:
- Select the free distance between the two lowest battens.
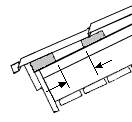
- Select the distance of the second lowest batten from the eave.
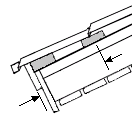
In both cases, the metal sheet type, the fastening method and the batten size affect the distance.
- Select the free distance between the two lowest battens.
- If you have already added the battens earlier, remove the old battens by selecting Delete in the message box.
- The program highlights the next roof slope in color. Continue by selecting roofing properties for each slope.
 Note
Note
- Single metal sheets are macros, which you can add and remove similarly to other macros.
- The length of the metal sheets is rounded up to the next 10 millimeters.
- The batten spacing has been defined in the roof properties.
- The battens are created similarly to a framing of a horizontal structure. The battens are profiles and you can handle them with profile functions.