
Opening a Roof Layout
Architectural, Framer
A roof layout shows all the roof slopes in the building model. The layout is opened in a drawing window of its own.
- Select a detailed representation for the roof slopes by using the Expand Layers function. This enables the program to read the framing properties of the battens from the correct structural layer.
- When you create the roof layout for the first time, select Output |
Order Forms |
 Roof
Layout. Later, you can open the roof layout by using the same function, or you
can select the function in the project document browser:
Roof
Layout. Later, you can open the roof layout by using the same function, or you
can select the function in the project document browser:- Move the cursor on the title Architectural documents / Roof layout.
- Right-click to open the context-sensitive menu.
- Select
 Roof
Layout.
Roof
Layout.
- If you have already created a roof layout of the project, you will be prompted "Picture
already exists, create a new one?" Do either of the following:
- If you want to open the layout you have created earlier, select No.
- If you want to create a new layout, select Yes.
The slopes are shown in a top projection. The program numbers the roof slopes and adds different eave macros to the layout automatically. The figure below shows examples of eave macros.
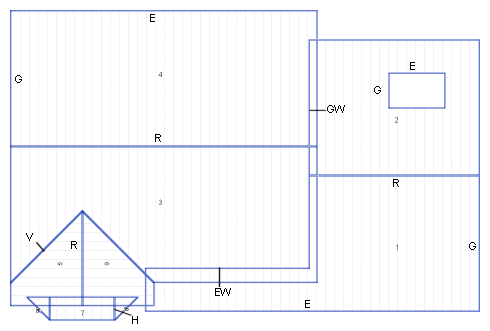
- E = Eave
- G = Gable
- R = Ridge
- V = Valley
- H = Hip
- EW = Eave next to a wall
- GW = Gable next to wall
The program uses the eave macros to collect the data of the roof's eave and ridge lengths as well as the material consumption, when you later collect the project's materials.
 Note
Note
- In complex roofs, you can remove automatically added eave macros and add new ones with the function Adding a Single Eave Macro, if necessary.
- When you have opened the roof layout, add roof siding origins to the slopes to define where to start the placing of sheets or tiles.
- You can add the dimensions of side and gable eaves to the roof layout by using the Check Roof Connections function.