
Edit the Edge Detail of a Cladding
Framer
By default, the installation of siding boards is started from the left edge of the panel (in the viewing direction). By editing the edge detail of a cladding, you can change the edge from which the installation will be started. In addition, you can define the mounting type of the edge boards (manual / loose part). You can edit the edge detail of both horizontal and vertical siding. This requires that the framing tool Cladding has been defined for the siding layer.
 Defaults for different corner types can be set in corner details. Customer-specific corner details have been stored in the custom/complibs/structdet_cst folder.
- Select a wall panel and a layer.
- Activate the middle grip point of the edge by moving the cursor close to the point.
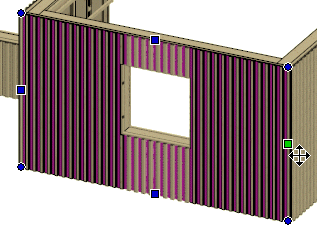
- Right-click to open the context-sensitive menu.
- Select
 Edit Edge Detail. The Mount dialog box opens.
 - Select one of the following Mounting of pieces on the edge options:
- None - Regular part.
- Mount Manually - A part to be mounted manually in the factory. Enter the number of manual parts starting from the edge in the Piece Count field.
- Loose Part - A part to be mounted at the building site. Enter the number of loose parts starting from the edge in the Piece Count field.
The property Mount Manually or Loose Part is saved in the part's data and affects the material collection.
- Select one of the following Installation Order options:
- Default - Use the default order to start the installation form the left edge of the panel. Left and right are determined by the viewing direction of the panel.
- From This Edge - Installation will be started from the selected edge.
- From Opposite Edge - Installation will be started from the opposite edge.
- Confirm by clicking OK.
- Regenerate the panel parts.
