
Trim Profiles to Library Parts
Profile Structure Design
Trimming to library parts is used when
- Profiles are cut with a laser cutter into a shape other than straight cut.
- You want separate profiles to be easy to position for welding.
- You want a notch to be machined into a long profile with a laser cutting machine, with which the profile can be bent into shape before welding.
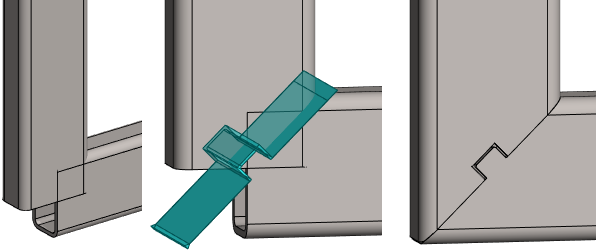
Trim profiles to a library part
- Start trimming:
- Vertex G4: Assembly | Tools |
 Library Part.
 - Vertex G4 Plant: Assembly | Steel Structures | Library Part.
- The program opens the browser and introduces trimming parts.
- Vertex G4: Assembly | Tools |
- Select the library part to which the profiles will be trimmed.
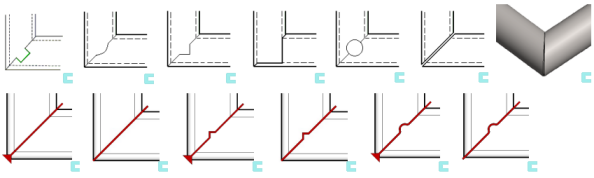
- Select the tools shown in the top row when trimming individual profiles.
- Select the tools shown in the bottom row when trimming profiles from which you intend to generate a step file for the pipe laser machine. Create a Profile Structure for a Pipe Laser Machine
- Select the profiles to be trimmed.
- Profiles should be in the same plane and in different directions.
- The program varies some dimensions based on the selected profiles and positions the library part at the connection point of the profiles.
- The program opens the dimension table.
- Enter the required values in the dimension table.
- It is especially important to enter the value of the wall thickness of the profile (t) to match the profile you have chosen, so that the step model printed on the laser machine will be the correct length.
- Select Apply to see if the values you entered are appropriate for the profiles you selected.
- Accept the values: OK.
- The program connects the library part to the profiles and trims the profiles to the library part.
- The program hides the library part.
Trim selected profiles to a library part
- Select the profiles to be trimmed.
- Start trimming.
- Select the function: Profiles | Trim |
 Library Part or
 - Select the context-sensitive function: Trim Profiles > To Library Part.
- Select the function: Profiles | Trim |
- Select the library part.
- Continue as above steps 4...6