
Lifting Points
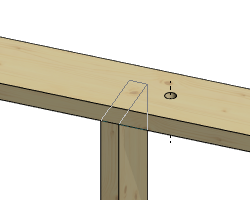
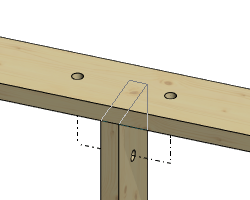
You can add lifting holes to one or more wall panels. 1, 2 or 4 lifting holes are added depending on the weight of the panel. The panel weight is calculated based on the weight of the wall frame, sheeting, siding, insulation, windows and doors. See the instructions for determining the weight of the panel parts Wall Panel Weight to a Panel Drawing. The lifting holes are positioned according to the gravity point of the panel.
- Select Modeling | Panel |
 Wall >
  Framing Accessories.
 - Select the folder Lifting Points.
- Double-click the thumbnail image Add lifting holes.
- Select the lifting point properties in the dialog box:
- Enter the diameter of the hole.
- Enter the distance (offset) of the hole from the edge of the stud.
- Enter the Max Spacing of the holes.
- Enter the weight limits of the panel that determine the number of holes:
- The number of holes is 1 when the weight of the panel is smaller than or equal to the value in the Maximum Weight field on the same row.
- The number of holes is 2 when the weight of the panel is smaller than or equal to the value in the Maximum Weight field on the same row.
- The number of holes is 4 when the weight of the panel is greater than the value in the Maximum Weight field on the previous row.
- Select the lifting hole type:
- One hole to top plate
- Two holes to top plate and one to stud
- One hole to top plate
- Select a wall panel.
- Confirm by clicking OK.
Note: You can change the default values of the lifting hole properties in the component library System Libraries / Accessory Tools / Lifting hole input for wall panels.
Delete Lifting Holes
Remove the lifting holes from the wall panel as follows:
- Select Modeling | Panel | Wall > Framing Accessories.
- Select the folder Lifting Points.
- Double-click the thumbnail image Delete lifting holes.
- Select one or more wall panels.
- Select Confirm.