
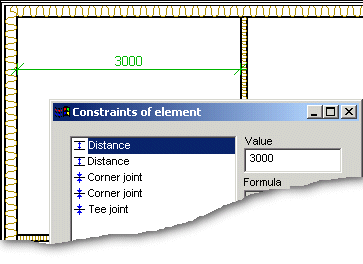
Constraints of Object Dialog Box
Once you have selected  Constraints from the context-sensitive menu, you can edit the
constraints of a building component in a dialog box. When you select a constraint from the
list in the dialog box, it will be highlighted in color in the drawing.
Constraints from the context-sensitive menu, you can edit the
constraints of a building component in a dialog box. When you select a constraint from the
list in the dialog box, it will be highlighted in color in the drawing.
Unrealized constraints are highlighted in red in the list of the dialog box, see An Overdefined Model. If the building component belongs to an option, and a constraint to a component outside the option has been set for it, the constraint is highlighted in grey in the list.
Dialog Box Options
- Value
- Move a building component fixed with a distance constraint. Select the desired distance constraint and enter a new value in the Value field. The changes will be updated in the building model when you click the Apply button or close the dialog box by clicking the OK button.
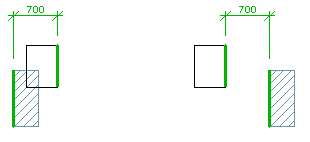
- Change side
- You can move a building component fixed with a distance constraint to the other side of the selected component by changing the chirality of the constraint. Select the desired distance constraint and click the Change side button. The changes will be updated in the building model when you click the Apply button or close the dialog box by clicking the OK button.
- Delete
- Select a constraint and click the Delete button.
- Position Fixed
- You can define the position of an element to be fixed by selecting the Position fixed checkbox. When you begin dimensioning the floor plan by adding distance constraints between, for example, walls, first select the wall or walls you wish to remain in place. Select the Position fixed constraint for these walls. When you change the value of the distance constraint, the fixed wall will remain in place and the wall connected to it with the distance constraint will move.
- Direction fixed
- You can define an element to be fixed by selecting the Direction fixed checkbox. The direction of the element retain, when geometric constraints are solved, but the position of the element can change.
- Top height, Locating height
- When height levels have been defined for a building model, the program will automatically constrain the added building component to the nearest height level. You can change the height level to which the building component is constrained, or define an offset relative to the height level for the building component.
 Constrain a Building Component to a Height
Level
Constrain a Building Component to a Height
Level- Apply
- You can update the changes to the floor plan without closing the dialog box by clicking the Apply button. Accept all changes at once by clicking the OK button.