
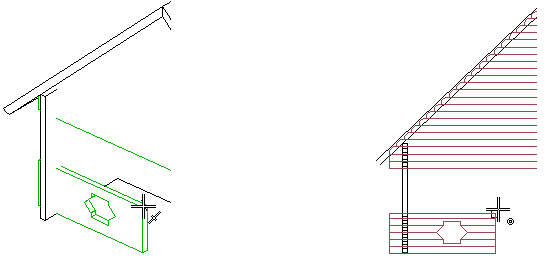
Add a Log Column
You can add a column to a log wall. The column is connected to the wall, and moves along when you move the wall. You can add settling space either to the top or bottom end of the column. Use the function in the model or in the log wall elevation.
- Do either of the following:
- Select a wall in the model. Select Log Wall | Log Wall |
 Add Log Column.
 - Open the elevation of the log wall with the function Edit Log Wall Shape. Select Log Wall Layout | Log | Log Column, or right-click to open the context-sensitive menu, and select Add Log Column.
- Select a wall in the model. Select Log Wall | Log Wall |
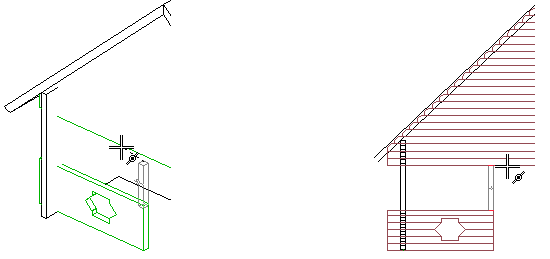
- Select the properties for the column by using the
 Properties function in the auxiliary menu. Select the cross section, cross sectional direction and reference point for the start end of the column as when adding a regular column. When you select a cross section in the Profile properties dialog box, the Log column parameter set should become active automatically.
-
Select the start point using the cursor, type the coordinates of the point, or use the snap functions in the context-sensitive menu. The cursor is vertically constrained.
-
If necessary, change the reference point by selecting a suitable alternative from the quick selections.

-
Select the end point using the cursor, type the coordinates of the point, or use the snap functions in the context-sensitive menu.
- Make the selections connected to settling space. Select the end of the column to which the settling space will be added. If the settling space is defined using an application development program, you can also make other selections, for example entering a new value for the settling space calculated by the program. The methods of defining the settling space are described in the Note box below.
The program will add the symbol of a screw-leg that acts as settling space to the log wall elevation. The screw-leg is also collected in the bill of materials.
- The settling space is defined with the Logw_Settle.prg application development program in the ../custom/sysprogs directory. If the application development program is not found, the settling_space keyword in the LOGHOUSE setup file is used to define the settling space.
- You can skip adding the settling space by clicking Cancel, and create a connection between the column and the log wall by selecting a connection detail from the joint library. You can select a tenon joint, or a drilling and a screw leg as the connection detail. If you remove or add logs above or below the column, the joint will follow.
- The column is connected to the wall as a sub object that is also displayed in the log work drawing of the wall.
- Please note, that a column added with the Modeling | Accessory Component |
 Profile >
  Column function is not connected to the log wall and therefore does not move along the wall.