
Add a Grip Point
General
- The grip point acts as a locating point for a feature or components when a feature is added to a part or a component is added to an assembly.
- The symbol of the grip point is the coordinate axes, where the red arrow represents the X direction, the green arrow represents the Y direction and the blue arrow represents the Z direction.
- The Z-direction of the grip point matters when a library feature or component is being added to a part or an assembly.
- When you add material to a part with a library feature, the Z-direction of the grip point (blue) points in the direction of the surface normal and inwards from the part's surface.
- When you remove material from a part with a library feature, the Z-direction of the grip point (blue) points in the direction of surface normal and outwards from the surface of the part.
- When you add a component to a hole in an assembly part, the Z-direction of the grip point (blue) points outward from the edge surface of the hole.
Add a Grip point
- From the part, select the point to which you wish to add a grip point.
- Select the context-sensitive function Add Handle.
- Fix the grip point's Z-direction by selecting a planar surface from the part.
- The plane's normal will be set as the grip point’s Z-direction.
You can also add a grip point to a part as follows
- Select the context-sensitive function Other Functions> Edit Named Elements.
- Select
 Insertion points.
 - Select Add.
- From the part, select the point to which you wish to add a grip point.
- Fix the grip point's Z-direction by selecting a planar surface from the part.
- The plane's normal will be set as the grip point’s Z-direction.
- Fix the grip point’s X-direction by selecting a planar surface from the part or accept the current direction by selecting the context-sensitive function
 OK or by pressing the middle mouse button. The normal of the selected surface will be set as the grip point's X-direction. Notice that the direction is determined only based on the component that is perpendicular to the selected Z-direction.
 - Enter the grip point’s Label into the Macro location dialog box.
- If necessary, move or rotate the grip point in the Macro location dialog box. Sketch Plane Location Data
- Select OK.
During steps 4, 5 or 6 you can select auxiliary functions from the model window's upper left corner so that you can position the grip point precisely how you want. You can limit the cursor snap so that you only select points, center points of lines, surface points or planar surfaces. You can define the grip point's location by selecting a point. The direction can be defined by selecting either two points so that the direction is a vector from the first point to the second, or by selecting a planar surface so that the direction is the normal of the surface.
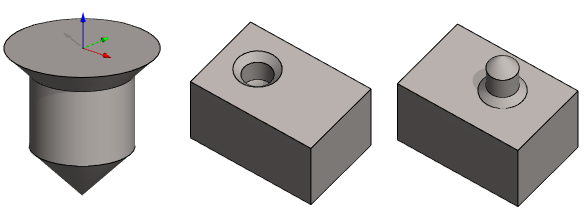
Example 1
- Left: Feature and grip point.
- Middle: Feature added with a cutout. (The Z axis of the feature was oriented out of the surface).
- Right: Feature added with a boss. (The Z axis of the feature was oriented from the surface toward the inside).
Example 2
A grip point has been added to the component on the bottom surface of the base, so that the grip point points downwards
- On the top row on the left: Component (5-angle screw) with the grip point at the end of the cylinder, at the bottom of the base.
- On the top row on the right: A component is being added to the assembly.
- On the bottom row on the left: The cursor is placed over the center of the hole. (The Z axis of the component is oriented from the edge of the hole facing out).
- On the bottom row on the right: The component is snapped into place.

Example 3
- Combined library feature: Define the direction of the Z axis so that when you add the feature on a sheet, its Z axis will not be set coincident with the sheet face normal, but in the direction opposite to the sheet face normal.
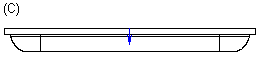
Figure 1: Combined library feature (C).