
Notch a Part With a Machining Part
Architectural, Framer
Add a machining G4 part to the model, and use it for notching a part. The machining parts have been saved in the joint library (macro_notch) included in the standard software delivery. So far, creating your own machining parts is not possible.
The part to be notched can be a profile, sheet or insulation, for example.
You can delete the notch by deleting the machining part.
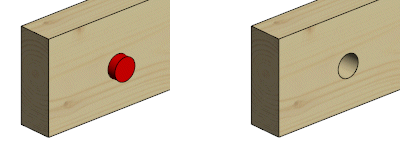
Note: If the machining part is not visible in the model, press the M key. Pressing the key will turn the parts on and off. The machining feature is highlighted in the model with red color.
Add the machining part to the model
- Select Modeling | Connection |
 Joint >
  Connection Details.
 - Select the folder Notch / Notching tools in the browser.
- Double-click the part's thumbnail.
- Select the dimensions of the part.
- Position the part where you want to notch. If necessary, rotate the part or change the reference point.
- Quit adding the part by pressing the Esc key.
Note: If the machining part is not visible in the model, press the M key. Pressing the key will turn the parts on and off. The machining feature is highlighted in the model with red color.
Notch the part
- Select on or more parts to be notched.
- Right-click to open the context-sensitive menu, and select Advanced > Modify Part by Model.
- Click one or more machining parts.
- Select Confirm.
- Press the M key to hide the geometry of the machining part in the model.
Notch all the parts at once
- Select one or more machining parts. You can select all machining parts at once when you select one and then press Ctrl+A.
- Right-click to open the context-sensitive menu, and select Advanced > Modify All Parts with Selected. All the parts that are hit by the machining part or parts are notched.
Note: The notch of a profile will be displayed in the model when the 3D-configuration of the profile’s features is True Features.