
Calculating Roof Tile Spacing and Eave Extension
You can add a special dimension constraint between the eaves and ridge of a tile roof, allowing you to determine the roof tile spacing and calculate the length of the eave extension. The tile spacing and the length of the extension are automatically updated as the roof pitch changes. You can define the special dimension constraint as follows:
- Fix the Dimensioning Eave to a Wall.
- Determine Tile Spacing with a Special Dimension Constraint.
- Determine the Length of the Extension with a Special Dimension Constraint.
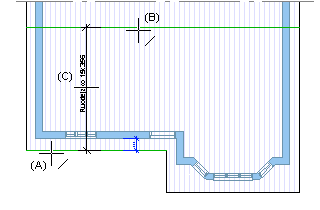
1. Fix the dimensioning eave to a wall
First define the position of the dimensioning eave as fixed. Add a dimension constraint fixing the dimensioning constraint (A) to a wall (B).

2. Determine the tile spacing
Define the tile spacing by adding a special dimension constraint between the dimensioning eave and the ridge.
- Select Modeling | Connection |
 Distance.
 - Select the eave line (A).
- Select the ridge (B).
- Select the location of the distance dimension (C). The Constraint Data dialog box opens.
- Click the Formula button.
- Select the calc_#spacing option from the Formula list.
- Confirm by clicking OK. The Tile Roof Data dialog box opens.
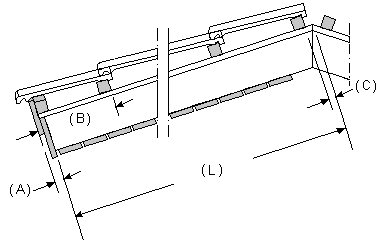
- Define the calculation parameters in the dialog box.
- Eave trim (A) - Total thickness of eave trims.
- Eave tile (B) - The distance of the 1st batten from the eave.
- Ridge tolerance (C) - The distance of the last batten from the ridge.
- Max. tile spacing - Enter the maximum allowed tile spacing in the text field.
- Confirm by clicking OK. The calculation parameters are saved for the slope.

3. Determine the length of the extension
Add a dimension constraint between the dimensioning eave and the eave extension.
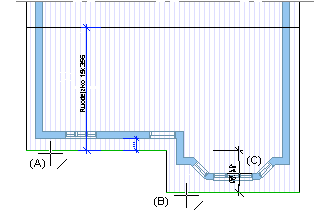
- Select Modeling | Connection | Distance.
- Select a line in the dimensioning line (A).
- Select a line in the eave extension (B).
- Select the location of the distance dimension (C). The Constraint Data dialog box opens.
- Click the Formula button.
- Select the number_of_tiles*#spacing*cos(#pitcha) option from the Formula list, for example 5*#spacing*cos(#pitcha). If necessary, edit the formula by modifying the number of tiles, for example 4*#spacing*cos(#pitcha).
- Confirm by clicking OK.
When you have added the special dimension constraint, you can change the number of tiles on the extension by editing the properties of the distance constraint. Double-click the distance constraint, and change the number of tiles in the Formula field.