
Adding and Editing a Ceiling
You can add a room-specific ceiling and edit it as follows:
- Select a room label.
- Move the cursor near the label's square grip point. The grip point is highlighted in green.
- Right-click to open the context-sensitive menu.
- Select Edit ceiling from the menu.
- If you have not yet added a ceiling for the room, select a structure from the list.
- Select the ceiling properties in the dialog box.
- Select either of the following as the height definition method:
- Top height - Define the height of the ceiling's top surface.
- Inner height - Define the height of the ceiling's bottom surface.
- Select either Horizontal or Oblique ceiling.
- Horizontal - Enter the height of a horizontal ceiling in relation to the floor base height in the text field.
- Oblique - Define the height of an oblique ceiling with
three points: define equal height for two points, and higher for the third point.
 You can define heights for
room's inner corner points only (corner point of the interior sheathing's inner
surface).
You can define heights for
room's inner corner points only (corner point of the interior sheathing's inner
surface).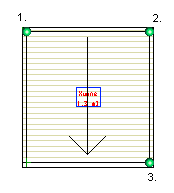
Define the height levels of points in the following way:
- Click the Height points button.
- Click the first point (1.) at the room's inner corner. The Height dialog box opens.
- Enter the ceiling height in the dialog box.
- Confirm by clicking OK.
- Click the second point (2.) in the same way.
- Define the third ceiling point at a higher level than the two previously defined. Click the third point (3.) at the room's inner corner.
- Select Confirm.
- If you select the Cut room walls with ceiling checkbox, the walls surrounding the room will be cut so that they reach the bottom surface of the ceiling.
- Select either of the following as the height definition method:
- Confirm by clicking OK.

 Note
Note
- You can divide a ceiling into parts with a split line.