
Add a Distance Constraint
General
- Define a distance constraint by clicking the element (face, line or point) to be affected by the constraint on both parts.
- A variable or formula can be given to the constraint if the distance is to be controlled using a dimension table.
- The constraint can be given a start and end value and the number of steps if the constraint is to be simulated between the start and end values.
- If the result is not what you expected, you can flip the Distance constraint or change its side.
Add an distance constraint between parts
- Select Assembly | Constraints |
 Distance constraint.
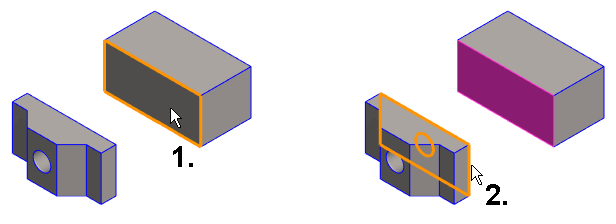
 - Select a face, line, or a point from the first part (1).
- Select a face, line, or a point from the second part (2).
- The program opens a dialog box: Edit constraint.
- See editing constraints: Edit Constraint
- Edit the value of the distance in the dialog box.
- Enter the variable or formula, if you want to control the distance by using the assembly dimension table.
- See dimension tables: Different Dimension Tables
- Enter the start and end values and the number of steps if you want to simulate the movement between two different distances.
- See simulation: Simulate an Assembly Constraint
- Select OK.
- The program moves the parts to the location defined by the constraint.
- If the position of the parts is not satisfactory, you can select the functions from the auxiliary menu:
 Change side of previous constraint changes the side of the constraint.
 Flip previous constraint flips the constraint.
 An earlier constraint may prevent the changing of side or flipping.
- Continue repeating steps 1 ... 8 until all the desired constraints have been added.
- Stop adding distance constraints:
- Select another function.
- Press the Esc key.
- Press the V key (Confirm).
- Select the context-sensitive function
 OK.
OK. - Click the middle mouse button.
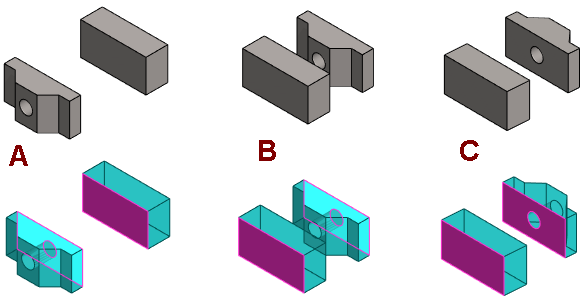
An example of changing the side and flipping of a dimension constraint
- A = The distance is entered.
- B = The side of the constraint is changed.
- C = The constraint is flipped. In this case, the second part flips.
Note:
- You can also use this function by first selecting the two parts, and then
- The ribbon bar function Distance or
- The context-sensitive function Constraints >
 Distance.
 - Select the second part Ctrl+left mouse button.
- The ribbon bar function
- You can undo the constraint last added by using the Undo function or by pressing Ctrl+Z before exiting constraint definition. The previous constraint solution is not restored.
- Zoom the part view by pressing the Z key to select an element. Zoom all by pressing the A key.
- You can specify the Distance constraint as configuration-specific and set limiting values for the dimension constraint. Select the constraint and the context-sensitive function Edit.
- Move a part by moving the cursor onto a part, then moving the mouse while holding down the left mouse button.
