Add a Face
General
- The function adds a surface to the part model using the lines in the model.
- The type and shape of the face are determined by the lines you selected to form the face. The result can be a planar face, perforated planar face, cylindrical face, ruled face, or a spline face.
- In order to form a face, you can select lines that form an open or a closed polyline.
- You can select the individual line, which can be the multipoint line such as the spline, or the closed line, like the circle.
- The line can be the guide curve, the line in the 3D sketch, separate line or the edge line of the face.
- You can control the shape of the face using guide curves.
- Guide curves can be open or closed and consist of individual lines or polylines.
- Guiding to virtual guide curves will also affect the shape of the edge lines of the face.
- If guide curves are used in the creation of the surface, lofting or sweep is always used as the method. You can add, change or delete elements you have selected for the face when adding the face, or later, by selecting the feature for editing.
 If you add a surface to a volume model, the model automatically becomes a surface model.

Add a Face
- Select the ribbon bar function Part | Faces |
 Add Face or
- Select the function Import | Faces | Add Face.
- Select the function Import | Faces |
- Select the line or the lines which form the open, or closed line chain.
- You can also select the single line or the quide curve.
- You can also select two separate lines between which you want to make a surface.
- Select Confirm (Confirm = V key, middle mouse button or the context-sensitive function
 OK)
OK)- The program opens the dialog box Add Surface.
- Define the face adding methods in the dialog box.
- Control method.
- No control.
- With guide lines.
- With virtual guide lines.
- Click the guide curves if you chose the control method With guide lines or With virtual guide lines.
- The guide curve must be a tangential line chain.
- If necessary, add, change or delete lines related to forming the surface.
- If necessary, select
 Closed.
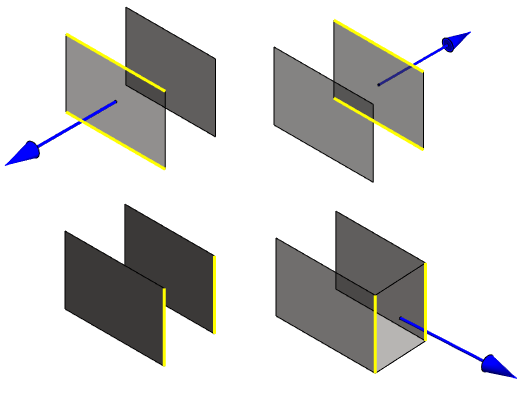
 - You can reverse the direction of the surface if you select Flip.
- An arrow points in the direction of the outside face.
- If necessary, select Stitch surfaces.
- If a surface is stitched, its direction is automatically defined by the adjacent surface(s).
- Use this option when you want to create a volume from surfaces.
- For more details, see face adding data.
- Control method.
- Click the Apply button to preview the surface to be added when you are adding, deleting or changing the lines of a surface.
- Select OK.
Add a surface to the selected lines
- Select the lines as follows.
- If you select only one closed polyline, the polyline becomes the edge line of a surface.
- When you select the single closed polyline or the open polyline, you can control the shape of the face by the Guide Curves. The surface(s) are created by sweeping.
- If you select several than the single open or closed polyline, you can control the shape of the surface by the Control Virtual Guide Curves. The surfaces are created by lofting.
- Select the context-sensitive function
 Faces > Add.
 - Continue as above steps 4… 6.
Example 1:
- A surface between two lines without a guide line.
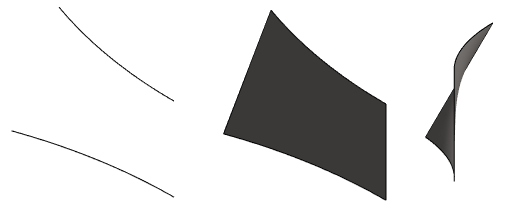
Example 2:
- A surface between two lines controlled by a guide curve.
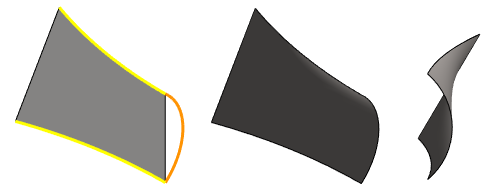
Example 3:
- Holes in the surface.
- All lines are in the plane and are selected.

Note:
- You cannot add a surface between two parallel surfaces:
- No surface is created between the lines selected in the right-hand image.
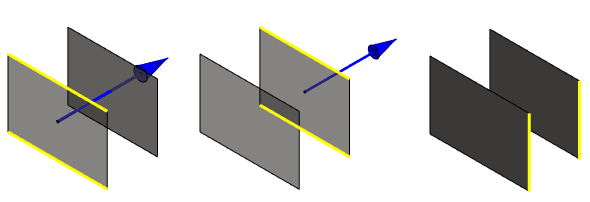
- But when you change the direction of the other surface, you can add a surface between.