
Convert a 2D Drawing into a Sheet Metal Model
Sheet-Metal Design
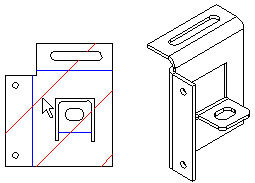
If you have, for example, received a 2D drawing of a sheet metal part, you can convert it into a 3D model with the Hatch to 3D Model function. You can bend a sheet based on the hatch and the bendlines of a 2D drawing, taking into account the strain on the sheet in accordance with the calculation method selected.
Convert into a 3D model as follows:
- Open a 2D drawing in the working window.
- Select Drawing | Hatch |
 Hatch.
 - Select one of the edges of the sheet. The function will add a hatch onto the whole area of the sheet.
- Draw the bend lines with the Drawing | Lines |
 Two-Point Line function, for example.
 - Select the bend lines that you drew and select the context-sensitive function
 Properties.
 - Select
 Bending line.
 - Select Change values.
- Fill in the data in the Properties of Bend dialog box.
- Select OK and OK again.
- Select the hatch in the 2D drawing.
- Select the context-sensitive function Hatch to 3D Model.
- Fill in the data in the Sheet Metal Parameters dialog box.
- Select OK.
- If you selected BendTable or K-Factor as the stretch calculation method, fill in the data in the Bend Properties dialog box. Select OK.
- The sheet metal model will open in the model window. Edit the model, if necessary, and save it.