
Copy Face Data
General
The dialog box is related to the function
- Part | Faces |
 Copy Face or
 - Import | Faces | Copy Face.
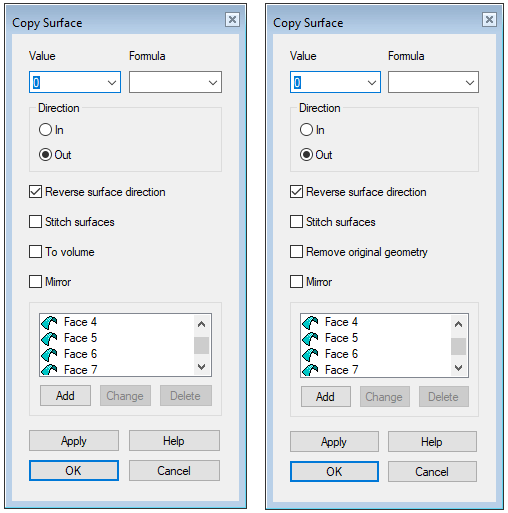
- The content of the dialog box varies depending on whether you are copying the part model's own surfaces, or whether you are copying the surfaces of other parts in the assembly.
- Copy a Face
Defines the offset from the original surface for the copied surface, and the surfaces to be copied. Specify the feature data in the dialog box.
Dialog box options
- Value
- Defines the offset (distance) from the original surface for the copied surface.
- If the value in the field is zero, the In and Out directions do not have an effect.
- Formula
- Defines the offset variable.
- In
- The copied surface is added on the inside in relation to the original surface.
- The inside is the invisible side of the surface if surfaces are drawn semi-transparent.
- You can also see the inside from the direction of the arrow, if you modify the surface, for example by double-clicking it, the direction of the arrow indicates the direction of the outside of the surface.
- The offset value defines the distance of the copied surface from the original surface.
- Out
- The copied surface is added on the outside in relation to the original surface.
- The outside is the visible side of the surface if the surfaces are drawn in semi-transparent form.
- You can also see the outside from the direction of the arrow, if you modify the surface, for example by double-clicking it, the direction of the arrow indicates the direction of the outside of the surface.
- The offset value defines the distance of the copied surface from the original surface.
- Reverse surface direction
- Reverse the direction of the surface relation to the original surface.
- Stitch surfaces
- Defines the joining of surfaces to each other when copying a surface.
- When you stitch surfaces when copying each surface, the creation of the volume is easier.
- Remove original geometry
- Only the copied faces remain visible when the check box
 Remove original geometry is selected.
- The function is only available when you copy a surface from a part of itself.
- To volume
- If you are modeling a new part in the assembly, you can model a sheet metal part by selecting the property To volume.
- When you confirm the data, the dialog box Offset Faces opens, in which Change to sheet metal part is selected.
- Mirror
- Mirroring facilitates the modeling of symmetrical pieces.
- You can mirror faces created when copying by selecting Mirror.
- Surface 1, (Mirroring plane), surface 2, etc.
- List of elements, based on which the feature is modeled. You can view and edit the selections before confirming the data.
 If you want to add faces, do as follows:
- Add
- If necessary, add surfaces to be copied.
- Select Add.
- Click the face or faces to be added.
- Select Confirm (Confirm = V key, middle mouse button or the context-sensitive function
 OK)
OK)
- You can add tangential surfaces if the option
 Search tangential surface chain is selected.
 - Change
- If necessary, change a surface to be copied to another surface.
- Select the face to be changed.
- Select Change.
- Click the replacing face.
- Delete
- If necessary, remove a surface to be copied.
- Select the face to be removed.
- Select Delete or press the Delete key.
- Apply
- Preview the model by clicking the Apply button in the dialog box.
- This will show you how the model would look if you confirmed the feature data by clicking OK.
- If necessary, you can still edit the surfaces you want to copy or other options.