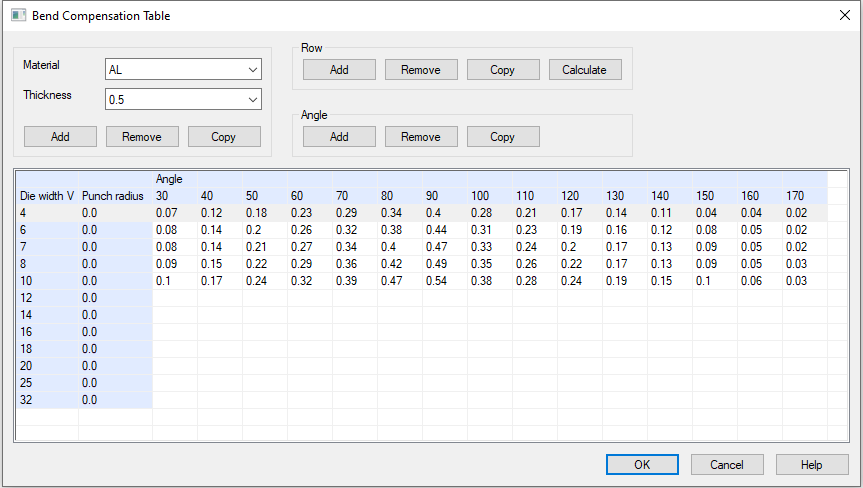
Edit Bend Deduction Table
Sheet-Metal Design
General
- The bend deduction table is a way to take into account the deformations caused by the bending of a sheet.
- Bend deduction table is in use when a parameter program whose name begins with BendTable has been selected as the stretch calculation method.
When bend deduction table is in use, you can define values for V-opening and tool radius in addition to other parameters for each bend from the drop-down lists using the functions:
The Bend Deduction Table contains a list of materials and each material has a list of thicknesses.
- All material/thickness pairs have their own table, in which one half of the bend deduction is displayed as a function of the die width V, punch radius and bend angle.
- It is possible to determine the values of the halves of the bend deductions experimentally, or if the bend deduction value for a 90 degree bend is known, values for other angles can be calculated based on it.
- The manufacturer of the bending machine might also deliver bend deduction tables.
 If you receive complete bend deduction tables, take into account that their values are not necessarily halves of the bend deductions.
You can add different materials and thicknesses into the bend deduction table and different die width v, punch radius and bend angle values for them.

Note: The values in the bend deduction table are HALVES of the bend deduction.
- Determine the bend deduction and divide it by two before adding it to the bend deduction table.
When the values of the bend deduction table have been calculated or determined manually for a certain material/thickness pair, you can add that pair as a material into the Sheet Metal Materials database.
- Select a parameter program whose name begins with BendTable and ends with the material of your choice into the Stretch Calculation field.
- After this you can easily select a material and thickness for a sheet metal part so that its deformations are calculated using the bend deduction table.
Edit Bend Deduction Table
-
Select System | Databases |
 Bend Deduction Table.
 - (OR) Select System | Databases | .
- Select the Material and Thickness from the drop-down lists, or add a new Material/Thickness pair by selecting Add.
- Edit the table values.
- Select OK.
Dialog Box Options
- Material
- The selected material.
- You can select a material from the drop-down list.
- Thickness
- The selected thickness.
- You can select a thickness from the drop-down list.
- Add
- You can add a Material/Thickness pair.
- Select Add.
- Enter the material's name and thickness into the opened dialog box.
- Select OK
- Delete
- You can remove the selected Material/Thickness pair.
- Select Delete.
- Select Yes.
- Copy
- You can copy the selected Material/Thickness pair into a new Material/Thickness pair.
- Select Copy.
- Enter the new material's name and thickness into the opened dialog box.
- Select OK
- Row: Add
- You can add a new row to the bend deduction table.
- Select Add under Row.
- Enter the new row's Die width V and Punch radius into the opened dialog box.
- Select OK.
- Row: Remove
- You can remove the selected row from the bend deduction table.
- Select the row to be deleted.
- Select Remove under Row.
- Select OK.
Note: The selected row will be removed from all Material/Thickness pairs. - Row: Copy
- You can copy an existing row's values into a new row.
- Select the row to be copied.
- Select Copy under Row.
- Enter the new row's Die width V and Punch radius into the opened dialog box.
- Select OK.
- Row - Calculate
- The program calculates missing values based on the values entered.
- Select Calculate under Row.
- Angle: Add
- You can add a new bend angle to the bend deduction table.
- Select Add under Angle.
- Enter a value for the bend angle in the opened dialog box.
- The bend angle must be greater than 0 and less than 180 degrees.
- Select OK.
- Angle: Remove
- You can remove the selected angle from the bend deduction table.
- Select the angle column to be removed.
- Select Remove under Angle.
- Select OK.
Note: The selected angle will be removed from all Material/Thickness pairs. - Angle: Copy
- You can copy an existing angle's values into a new angle.
- Select the angle column to be copied.
- Select Copy under Angle.
- Enter the value of the new angle in the opened dialog box.
- Select OK.

 Application