Create Tangential Faces
Advanced Face Modeling Package
General
- This feature is enabled if you have the Advanced Face Modeling Functions add-on option.
- The face selected with the function is made a tangential face to the faces surrounding it.
- If necessary, you can select one or more face edge lines to which tangentiality is added. This creates a sharp corner at the other edge lines.
- If you do not select any face edge lines, the face will be tangential to all edge lines.
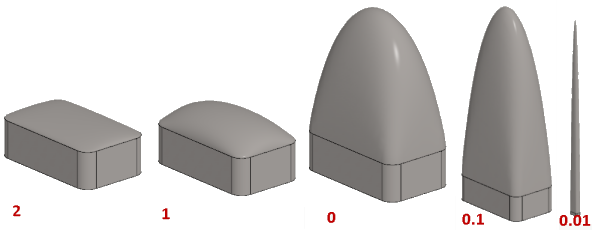
- The higher the flattening, the lower the shape.
- Zero represents kind of a default value.
- The suitable value is determined experimentally and depends on the shape. For example, try values between 0.1 and 2.
Create a Tangential Face
- Select the ribbon bar function Part | Faces |
 Create Tangential Faces or
- Import | Faces | Create Tangential Faces.
- Import | Faces |
- Click a face or faces.
- Select Confirm (Confirm = V key, middle mouse button or the context-sensitive function
 OK.)
OK.)- The program opens the Create Tangential Face dialog box.
- Define the tangential face data in the dialog box.
- Enter flattening.
- Try the default value 0.
- Change the factor moderately, if necessary.
- Invert the face direction, if necessary
- Adjust the maximum number of spans, if necessary.
- Tangential geometry
- Select the edge lines of the face where tangency takes place.
 If you do not select edge lines, then tangency occurs at all edges.
- If necessary, select the guide curve lines controlling the tangency
- Enter flattening.
- Click Apply to see what kind of face the program creates with the values you enter.
- If necessary, you can use the buttons to affect the faces to be replaced, the edges of the tangency face and the guide curves:
- Add.
- Change.
- Delete.
- Select OK.
Editing the selected face into a tangential face
- Select one or more faces in a part model.
- Hold down the Ctrl key if you select more than one face.
- Select the context-sensitive function
 Faces> Make Tangential.
- The program opens the Create Tangential Face dialog box.
- Continue as above, steps 4...7.
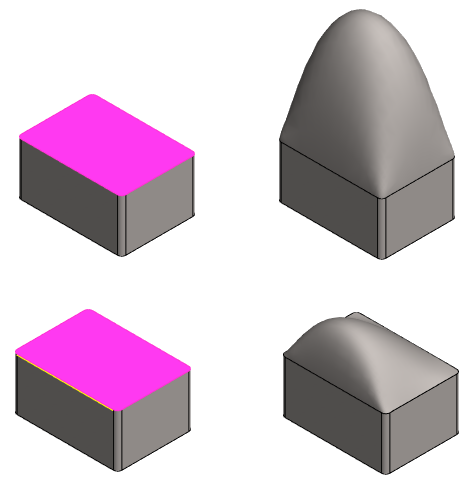
Example 1
Comparison of the tangential face of a sharp-cornered part and a part with corners rounded.
- The flattening is 0 (zero) in both.
- The example shows that the function is applicable mainly only to faces with non-sharp corners.
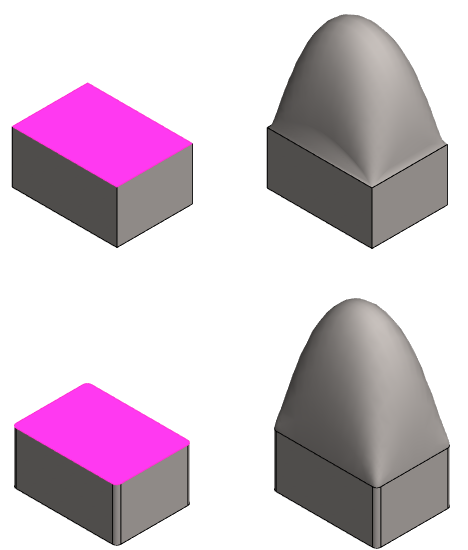
Example 2
Comparison when tangential geometry is or is not selected
- No tangential edge is selected in the upper image.
- In the lower image, one line (yellow) is selected as the tangential edge line.
- The flattening is 0 (zero) in both.
Example 3
- In the image, different tangency factors have been used for the same cross section.