
Tweak Faces of One Part to Another
Advanced Face Modeling Package
General
- The function is suitable for tweaking profiles or profile-like parts (extruded or swept shape) to other parts, i.e. the desired faces are trimmed to other faces so that the adjacent faces continue "naturally".
- The selected face chain must be continuous.
- The faces to be tweaked must connect with the selected chain of faces if the volume to be trimmed is intended to extend to the chain in question.
- If possible, holes will be automatically removed from the target faces (works for holes that are completely inside individual faces).
- The "face chain" formed by the target faces is extended at their edges as far as possible so that the faces to be tweaked fit better.
- The tweaking works most reliably when the target faces do not initially intersect with the object to be trimmed.
Starting point
- Both parts to be tweaked are in the same assembly.
- The assembly is on the Vertex desktop.
Tweak the faces of the parts
- Select the part that will be tweaked to the other part.
- Select Edit.
- Select the ribbon bar function Part | Faces |
 Tweak Faces or
- Import | Faces | Tweak Faces.
- The dialog box Tweak Faces opens.
- Tweak Faces Data
- Import | Faces |
- First, select the target faces.
- Click Add at Target faces.
- Select all adjacent target faces.
- Confirm the selection of target faces. (Confirm = V key, middle mouse button or the context-sensitive function
 OK.)
OK.)
- Select the faces to be tweaked
- Click Add at Tweak faces.
- Select all adjacent faces to be tweaked, eg. the end face of a profile.
- Confirm the selection of faces to be tweaked. (Confirm = V key, middle mouse button or the context-sensitive function OK.)
- Select OK.
Tweak selected faces
- Select one or more faces in the part that you want to tweak to the face of the other part that appears in the assembly.
- Select the context-sensitive function
 Faces>
  Tweak faces.
 - Select the target faces.
- Click Add at Tweak faces.
- Select all adjacent faces to be tweaked, eg. the end face of a profile.
- Confirm the selection of faces to be tweaked. (Confirm = V key, middle mouse button or the context-sensitive function OK.)
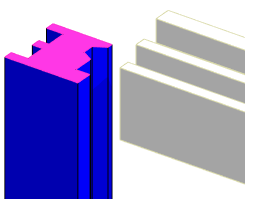
Example
Two profile-like parts are tweaked together.
Processing the first profile:
- The blue vertical profile is selected for editing.
- The end face of the profile has been selected for tweaking.
- The context-sensitive function Faces > Tweak Faces is selected.
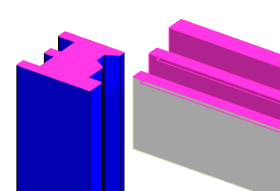
- The upper surfaces of the gray horizontal profile is selected, including the vertical faces, in order to make the selected set of target faces continuous.

- The tweak is confirmed by clicking OK.
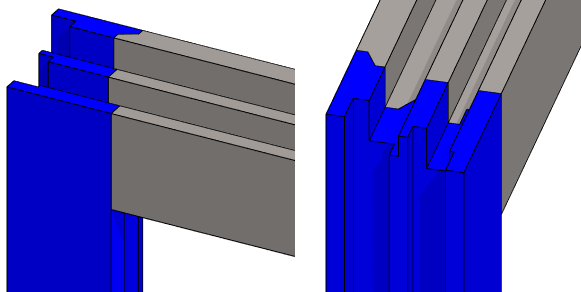
- The blue profile in the image above is tweaked to the gray profile.
Processing the second profile:
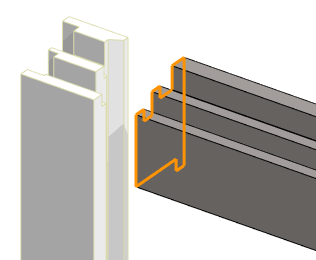
- The gray horizontal profile is selected for editing.
- The end face of the horizontal profile has been selected for tweaking.
- The context-sensitive function Faces > Tweak Faces is selected.

- Side faces of the vertical profile are selected, including those faces that "appear as a line" from the direction of the horizontal profile to create a continuous set from the selected target faces.
- The tweak is confirmed by clicking OK.
- Now the horizontal profile is also tweaked to the vertical profile.
Note:
- The tweaking works most reliably when the target faces do not initially intersect with the object to be trimmed.
- The faces to be tweaked must connect with the selected chain of faces if the chain to be trimmed is intended to extend to the chain in question.