
Model Sketching Mode - Plane Sketch 2D
General
This topic deals with
- Activating the sketching mode.
- Accepting the finished sketch. That is, moving from the sketch to the sketch operation.
- Exit the sketch, i.e. reject the changes made to the sketch.
- Editing a sketch.
- Viewing a sketch.
- Properties of a sketch.
Activating the Sketching Mode
The sketching mode is activated, when you add a new sketch to a part or edit a sketch.
Add a new plane sketch to the part model, it also defines the plane along which the elements of the sketch are drawn.
- Select the function Part | Sketch | To Face or Line >
 To horizontal (XY) plane.
 To vertical (XZ) plane.
 To lateral (YZ) plane.
- Or select the context-sensitive function
 New Sketch > To horizontal (XY), vertical (XZ) or lateral (YZ) plane.
 - If you select a surface from the geometry first, select the context-sensitive function New Sketch > and then select
- Face.
- Parallel.
- Angle.
- Advanced.
- You can also select a line, a line and a point or three points from the geometry and then the context-sensitive function New Sketch
Accepting a Finished Sketch
To stop sketching, select the function Sketch | Return |  OK or
OK or
OK or- select the context-sensitive function
 OK.
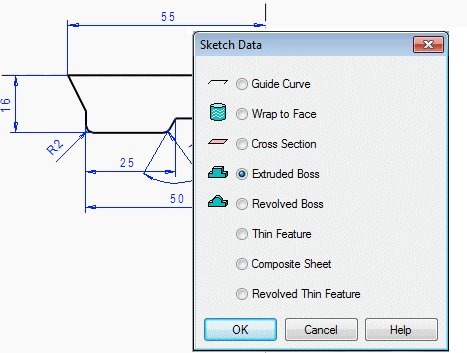
OK. - After this, the program presents a dialog box, from which you can choose the operation to be performed on the sketch.
- The sketch will be saved in the feature. The part's feature tree will show the feature and sketch as a phase.
- See: Features Based on a Sketch.
After this, you can either make a new sketch or perform other functions that modify the model, such as round, bevel, draft, shell.
Exit the sketch, discarding the changes made
Exit the sketch and reject the changes made to the sketch.
- Select the function Sketch | Return |
 Exit or
 - Select the context-sensitive function
 Exit.
Exit.
Editing a Sketch
During modeling, you can return to edit a feature's sketch, if necessary. You can select a sketch to edit:
- In the feature tree, click on the sketch you want to edit and select the context-sensitive function Edit.
- or select the surface formed by the feature from the part and then the context-sensitive function Edit Sketch.
Viewing a Sketch
You can view the sketch perpendicular to the sketch plane.
- Select Sketch | Settings |
 View and Usage > Perpendicular. If this is selected, the sketch will automatically rotate to a position perpendicular to the drawing plane when entering the sketch.
 - or the context-sensitive function Perpendicular which turns the sketch perpendicularly.
You can rotate the sketch to different positions or pan the sketch
- Rotate the sketch with Shift+left mouse button or with the middle mouse button.
- Pan the sketch Shift+middle mouse button.
- Zoom the sketch with the mouse wheel or by moving the mouse by simultaneously pressing Shift+right mouse button.
In sketch mode, you can adjust the settings affecting the visibility of the sketch and other geometry with the options in the Sketch | Settings group.
- See: Sketch Mode Settings
Sketch Properties
The sketch can be viewed with a grid to help drawing.
- See: Grid Properties.
The cursor automatically changes from a cross to an arrow between functions. In addition, the cursor and its ability to snap to nearby elements (search area) can be adjusted.
- See: Cursor Properties.
- See: Cursor when Selecting Geometry
The size and dimensions of the center cross of the sketch can be adjusted.