Shell
The function makes a shell structure of a part. Select one or more faces to be penetrated, and enter the wall thickness. The thickness will be the same for all walls.
The Ribbon Bar Function
- On the
 tab, in the Tools group, select
  Shell.
 - Click one or more faces to be penetrated.
- Select Confirm (Confirm = V key, middle mouse button or the context-sensitive
 OK.)
OK.)- The Shelling dialog box opens.
- Define the shell properties.
- Enter the wall thickness.
- Specify in which direction the shelling is made.
- Preview the shelling by clicking the Apply button in the dialog box. If necessary, you can still edit the feature data.
- Select OK.
From the context-sensitive menu
- Select one or more faces to be penetrated.
- Click the second surface with the Ctrl key pressed down, etc.
- Select the context-sensitive function
 Shell.
- The Shelling dialog box opens.
- See above steps 4... 6
Note:
- Edit the data of a feature by first selecting the face formed by the feature, then selecting the context-sensitive function Edit Operation.
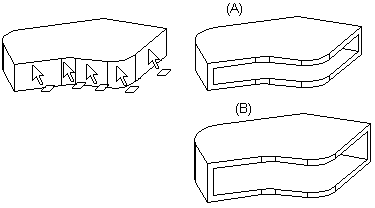
Example: Wall on the inside/outside
The faces to be penetrated have been selected for shelling. The wall has been added:
- In the image A inside the part. The external dimensions of the part remain unchanged.
- In the image B outside the part. The external dimensions of the part increase by the thickness of the wall.
- The dimensions of the part do not increase in the direction of the permeable surfaces.