
Edit the Dimension Table of an Assembly
General
- You can edit all variable values related to the assembly and its local parts.
- You can enter descriptions of variables related to assembly constraints in the dimension table.
- You can change the dimensions of all components of the same size by selecting a new dimension table row.
- You can add rows to the dimension table that describe allowed or recommended sizes.
Edit the dimension table and add rows to it
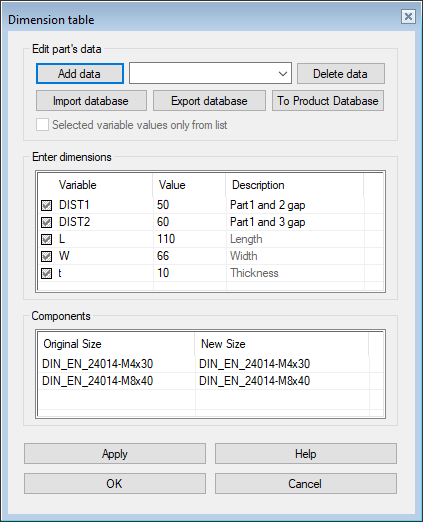
- Select the context-sensitive function Dimension Table.
- Fill in the information in the Description column if the variable name is not descriptive enough.
- You can only edit the descriptions of the variables related to the assembly constraints.
- The descriptions of the variables of a local part can only be supplemented after you have first selected the part and the context-sensitive function Edit.
- Enter the label of the dimension table row in the top field.
- Do this only if you want to control the assembly by selecting the dimension table rows.
- Enter the desired variable values in the Value column.
- See dialog box information: Dimension Table Data Dialog Box
- Save the row by clicking the Add Data button.
- Repeat steps 4 and 5 until all the sizes you need are entered.
- If you have a large number of sizes, you might want to enter the data in Excel. See the Export Database section below.
- If you want the user to be able to select only the sizes that are stored in the dimension table, select
 Selected variable values only from the list.
- The selection is only activated when the first dimension table row is saved.
- This option is only relevant if you save the assembly to the component library.
 Please note that the assembly that is stored in the component library must contain only local parts.
- If, however, the user is allowed to change the value of a variable, leave the Variable column checkbox
 unchecked in that row.
- If necessary, change the size of the same components in the assembly to another size.
- Click on the row for the component to be replaced.
- Click the preset button
 in the New Size field.
- The program opens a list of available options.
- Select a new size from the list.
- Select OK.
- The program varies the assembly and the local parts to the dimensions that are currently in the dimension table.