
Add, Delete and Edit the Rounds in the List
General
- The functions dealing with the list of rounds can be found in the context-sensitive menu when you are adding or editing bevels.
- You can add a round to a new edge or you can remove a round from an edge.
- You can change the round of the edge to another edge.
- You can edit the values of the rounds either all at once or by selecting one or more rows from the list and then entering the new values.
Select a round feature for editing
You can select a round feature for editing in the following ways:
- Double-click the round face in the model or
- Double-click a round feature in the feature tree or
- Click on the Round/Bevel feature in the feature tree and select the context-sensitive function Edit operation.
Add a new edge to the round feature
- Click any Edge in the bevel list.
- Right-click to open the context-sensitive menu.
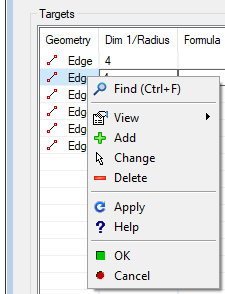
- Select the
 Add function.
 - Click one or more edge lines to be rounded.
- Stop selecting the lines
- Press the middle mouse button or
- Press the V key or
- Select the context-sensitive function
 OK.
OK.
The program adds the selected lines to the end of the list and adds the previous round value for them.
- If necessary, click the rows/rows of added rounds and enter the appropriate values for them.
- Confirm the feature data by clicking OK.
Delete the round of one edge
- Click on the the round you want to delete next to the word Edge in the list.
- In the model window, only the line of that edge remains highlighted.
- Right-click to open the context-sensitive menu.
- Select the
 Delete function.
 - Confirm the feature data by clicking OK.
Change the round to the other edge
- Click the round you want to change next to the word Edge in the list.
- In the model window, only the line of that edge remains highlighted.
- Right-click to open the context-sensitive menu.
- Select the context-sensitive function
 Change.
 - Click the edge line to which the round is moved.
- Confirm the feature data by clicking OK.
Note: