Slot (Obround)
General
- You can sketch a mounting hole (i.e. the "oval" or "flat oval" hole) by clicking three points.
- The first two points define the direction and length of the hole from the center to the center of the arcs of the circle, and the third point defines the width of the mounting hole.
- In the center of the mounting hole, four segments of the guide line are drawn, which can later be used, e.g. in the assembly, to position the parts.

- The program automatically adds the necessary coincidence, tangential, equal distance and parallel constraints.
- You can also enter the dimensions of the mounting hole from the keyboard, in which case the program will add distance constraints to the sketch.
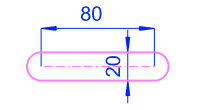
- In the figure below, the first dimension (80) entered is the length of the mounting hole.
- The second dimension entered (20) is the width of the mounting hole.

Sketch a mounting hole
- Select the function Sketch | Lines |
 Obround or
- select the context-sensitive function
 Circle >
  Obround
- select the context-sensitive function
- If necessary, select the line properties, under Sketch | Style
- Click the start point of the mounting hole.
- Click the end point of the mounting hole.
- Instead of clicking the point, you can enter the length of the mounting hole from the keyboard.
- Click the width of the mounting hole.
- Instead of clicking the width, you can enter the width of the mounting hole from the keyboard.
- Repeat steps 2 to 5 to continue sketching mounting holes.
- Stop sketching mounting holes
- Select another function or
- Press the middle mouse button or
- Press the Esc key or
- Press the V key (V = Confirm).
Note:
You can orient the mounting hole after clicking the first point, using the cursor X and Y locks or the directional shortcut keys U, I, E or T.
- U: Locks the direction to the horizontal of the sketch plane (X axis direction).
- I: Locks the direction to the vertical of the sketch plane (Y axis direction).
- E: Locks the direction in the direction of the line under the cursor.
- T: Locks the direction in a direction perpendicular to the line under the cursor.

