
Pattern Using a Table
General
- You can create a pattern by entering the coordinates of the members of the pattern into the basic feature of the pattern, i.e. the "parent" feature.
- If necessary, you can enter a formula for the coordinates if you want to control the position of the members of the pattern using a dimension table.
- You can add or remove rows in the table by using the context-sensitive menu.
- You can also edit the table in Excel.
- When creating a new table pattern, the program remembers the data of the old table patterns.
Starting point
- A part has a boss or cutout extrusion or revolution, library feature, swipe or loft that is used as the "parent" feature to form the pattern.
Create a pattern by adding the members of the pattern to a table
- Select Part | Tools |
 Pattern.
 - Select the surface from the feature, which the pattern is created.
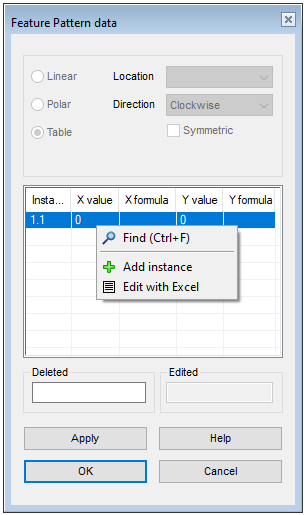
- The program opens the dialog box Feature Pattern Data.
- Select
 Table.
- The program switches the dialog box to a table input option.
- The program switches the dialog box to a table input option.
- Click on the first row of the table (1.1), which tells the coordinates (0,0) of the "parent" feature.
- Add rows to the table with context-sensitive function
 Add instance.
- You can remove table rows with the context-sensitive function
 Delete instance.
- You can remove table rows with the context-sensitive function
- Fill in the coordinates of the pattern members, relative to the "parent" feature and enter formulas if necessary if you want to control the position of the pattern members using a dimension table.
- Confirm the pattern data by clicking OK.
The Context-Sensitive Function
- Select the parent feature from a part as follows:
- Select one or mode Boss or Cutout operation from the part's feature tree.
- In addition to these, you can choose a rounding or bevel that is connected to the above selected features.
- Select on or more face from the part. Select more than one feature by holding down the Ctrl key while clicking with the left mouse button.
- If you want to create a feature pattern from a rounding or a bevel, you must also include the feature to whose geometry the rounding/bevel has been added.
- Select the context-sensitive function
 Feature Pattern.
 - Steps 3 … 7, as above.
Edit the table in Excel
- Proceed as in the beginning steps 1...4.
- Select the context-sensitive function
 Edit with Excel..
- The program opens the table in Excel.
- In Excel, the so-called macro execution must be allowed.
- The data of the "parent feature" is not displayed in the Excel table.
- Complete the table in Excel.
- Save the table in Excel.
- Keep the XML format.
- Close the Excel program
- The data is automatically transferred to the Feature Pattern Data dialog box in Vertex.
- Confirm the pattern data by clicking OK.
An example of a table pattern
- Three rows have been added to the table.
